Peanut Butter Fudge Pie

pieby Karen Frazier

If you’re on a low-carb or gluten-free diet, you can still enjoy sweets from time to time. This peanut butter fudge pie is easy to make, low in carbs, and it has a chocolatey nut crust, so it’s gluten-free and dairy-free, as well. To make it paleo (but not low-carb), you can replace the sweetener in the crust and the filling with pure maple syrup or honey to taste. I don’t like things to be super sweet, so I recommend doing the add a little sweetener and taste until you get to your desired level of sweetness, or the pie might not be sweet enough for you as written.

  • 1  1/2 cups pecans
  • 1/4 cup cocoa powder
  • 3/4 cup granulated Truvia (in the green plastic jar) or Swerve sweetener
  • 1/4 cup melted coconut oil
  • 4 ounces unsweetened chocolate
  • 1/2 cup peanut butter
  • 3 (14-ounce) cans coconut milk (full-fat), refrigerated overnight until the liquid separates from the cream (discard the liquid), or 2 cups coconut cream, divided
  • 2 teaspoons vanilla extract, divided
  • 15 to 20 drops of liquid stevia or liquid sucralose (or to taste – you may want more)
  1. Preheat your oven to 350 degrees Fahrenheit.
  2. Grease a pie plate with coconut oil.
  3. In a food processor, pulse the pecans, cocoa powder, and Truvia or Swerve until well chopped, about 15 one-second pulses.
  4. Add the melted coconut oil and continue processing for 30 seconds.
  5. Press into the prepared pie plate. Bake the crust in the oven until browned and fragrant, 15 to 20 minutes. Allow to cool on a wire rack.
  6. In a small saucepan (or in the microwave), melt the chocolate and peanut butter, stirring to combine.
  7. In a large bowl, combine two of the cans of the coconut cream (just the thick part with the water poured off – about one and a half cups) with one teaspoon of the vanilla and the liquid stevia or sucralose.
  8. Add the melted chocolate and peanut butter. Beat until well combined.
  9. Pour into the cooled crust. Refrigerate until the filling hardens.
  10. In a medium bowl, combine the remaining one can of coconut cream (or a half cup of the cream without the liquid), the remaining teaspoon of vanilla, and stevia or sucralose drops to taste. Beat with an electric beater on high until fluffy, three to four minutes. Spread on the chilled pie. Return to the refrigerator until you are ready to serve.

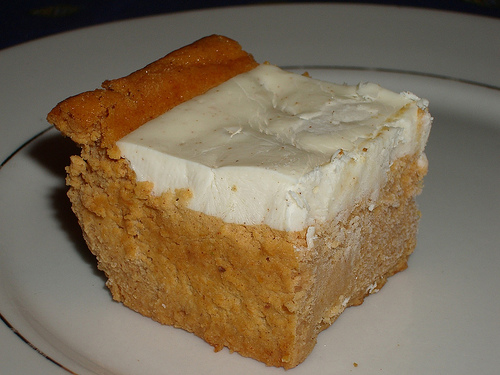
photo credit: “Squared” Coconut Pie via photopin (license)

Chocolate Nut Butter Fudge

fudgeby Karen Frazier

I bought a few cans of coconut milk the other day and found, as often happens, the coconut milk had separated into cream at the top of the can with the water condensing in the bottom. This separation of the solids and liquids, I realized, is the perfect way to add a creamy element to a lot of different foods.

My first thought was using these coconut milk solids (the coconut cream) to make icing, since they had a texture similar to chilled butter, albeit a bit creamier and less dense. However, I didn’t feel like messing with paleo flours to bake a cake or brownies, but I still wanted to mess around with the cream a bit.

Then it hit me. If I mixed the coconut cream with a nut butter and some melted chocolate, it would develop a fudge-like consistency. Or that was my hope. So I gave it a try, and it worked. The result was a creamy, low-carb, vegan, paleo, tasty fudge with the perfect texture and the exact right level of sweetness.

You’ll need to use canned coconut milk here – the full-fat kind, not lite coconut milk. Usually you can tell if the solids and liquids have separated by giving the can a shake and listening. There won’t be a liquid sloshing sound. If, for some reason, it hasn’t separated, then you can refrigerate the unopened can overnight, which should do the trick.

The cans of coconut milk where this is most likely to happen are those without any additives or emulsifiers – so check the ingredients and make sure it only lists coconut cream and water. This is the type that is most likely to separate.

When you open the can, pour away the water and use a rubber spatula to scrape all of the solid coconut cream out. Some stores also sell coconut cream, and you can use that, as well.

Choose a nut butter that works with your diet. If you’re paleo, sugar-free, organic almond butter works well here. If you’re not paleo, then use organic, sugar-free peanut butter instead. I don’t specify an amount of liquid stevia (for paleo), or liquid sucralose (for non-paleo, low-carb) because sweetness preferences vary. I tend to like my dessert not very sweet, so I don’t add a lot of sweetener. To get the right amount of sweetness, add a bit of the liquid sweetener (5-10 drops), taste, add more, taste – and continue until you reach the desired sweetness level.

Chocolate Nut Butter Fudge

  • 2 ounces unsweetened dark, vegan chocolate
  • 1/3 cup nut butter
  • 1 (14-ounce) can full-fat coconut milk, drained or 3/4 cup unsweetened coconut cream
  • 1 teaspoon vanilla
  • Liquid stevia or liquid sucralose to taste
  1. Line an eight-inch square pan with parchment.
  2. In your microwave or on the stove, melt the nut butter and chocolate. If melting on the stovetop, do it on low heat and stir frequently. In the microwave, cook on high for 30 seconds, stir, and repeat until smooth.
  3. In a medium-sized bowl or stand mixer, beat the melted chocolate and nut butter, coconut cream, vanilla, and sweetener until smooth. Taste and add more sweetener as desired.
  4. Pour into the prepared pan using a rubber spatula to spread it in an even layer. Freeze for one hour. Cut into squares, and store the fudge in a zipper bag in the fridge or freezer.

photo credit: Coffee Fudge via photopin (license)

Low-Carb Chocolate Peanut Butter Cheesecake

IMG_1460by Karen Frazier

When I take a day off from paleo, it’s often for dairy foods. However, I always try to keep carbs deeply in check and still use the healthiest forms of the ingredients I can find. So while I may occasionally make, oh….say….a cheese cake, I make it as low in carbs as possible. I also do it infrequently – once or twice a year – so when I do, it’s a real treat.

Jim’s favorite low-carb cheesecake is a pumpkin-bourbon cheesecake with Chinese five spice powder, but I love peanut butter. So I thought I’d try to make a cheesecake that has peanut butter cup flavors, but keep it relatively low-carb.

Ingredients

For the crust:

  • 3/4 cup pecans
  • 3/4 cup peanuts
  • 3/4 cup Swerve sweetener, Truvia (the kind without sugar), or erythritol
  • 3 tablespoons unsweetened cocoa powder
  • 3 tablespoons grass-fed butter

For the filling:

  • 4 (8 ounce) packages grass-fed cream cheese, softened
  • 4 eggs
  • 1 cup organic peanut butter
  • 1/4 cup grass-fed sour cream
  • 2 teaspoons vanilla
  • 1 1/2 cups Swerve sweetener, Truvia (not the baking blend, which has sugar), or erythritol

For the topping:

Instructions

For the crust:

  1. Preheat your oven to 350 degrees Fahrenheit. Grease a 9-inch spring-form pan with grass-fed butter on the bottom and sides.
  2. In a food processor, pulse the pecans, peanuts, sweetener, and cocoa powder for ten one-second pulses.
  3. Add the butter and pulse for ten more one-second pulses.
  4. Press the mixture into the bottom of the prepared spring form pan and set aside.

For the filling:

  1. In a stand mixer, food processor, or a large bowl (you can use an electric mixer to mix), combine all of the filling ingredients. Process or mix until smooth.
  2. Pour into the prepared spring form pan, spreading it over the top of the crust.
  3. Bake in the preheated oven until the middle is set, 50 to 55 minutes.

For the topping:

  1. In a small bowl, beat the sour cream, peanut butter, and sweetener until smooth.
  2. Spread the mixture evenly over the top of the cheesecake as soon as it comes out of the oven. Return the cheesecake to the oven for five minutes.
  3. Cool the cheesecake on a wire rack for two hours.
  4. In a small bowl, mix together the chopped peanuts and the chocolate chips.
  5. Sprinkle evenly over the topping.
  6. Run a butter knife around the inside edge of the pan.
  7. Release the cheesecake from the spring form. Refrigerate for two more hours.

Orange-Almond Spice Cookie Bars

IMG_0908by Karen Frazier

I have always been a baker. Puttering around in the kitchen baking stuff is one of my favorite ways to while away an autumn weekend afternoon while Jim watches football. With the celiac disease and my low-carb, paleo diet, however, I stopped engaging in that love. It’s only been recently that I’ve started tinkering with baking once again.

This recipe came to me in a flash of inspiration a few days ago, and I decided last night to give it a try. I was worried about lots of things – tweaking ratios, etc., but the cookies came out really well on the first try. Feel free to mess around with the flavor profiles. I love the way the orange, spice, almond, and chocolate blend in this tasty recipe.

The cookies are paleo-ish – the erythritol in the sweetener renders them not quite paleo; however, if you aren’t baking low-carb, you can replace the sweetener with coconut sugar. It will raise the carb count, but keep the cookies paleo. So it’s a matter of blood sugar vs. staying totally paleo.

Orange-Almond Spice Cookie Bars

  • 1 cup plus 2 tablespoons coconut oil, melted
  • 1 cup Swerve Sweetener or Truvia (for low-carb) or coconut sugar (for paleo)
  • 3/4 teaspoon almond extract
  • Zest of one orange
  • 1 teaspoon Chinese Five Spice powder
  • 2 eggs
  • 2 cups almond meal flour
  • 1/2 teaspoon sea salt
  • 6 ounces unsweetened dark chocolate
  • Liquid stevia, to taste
  1. Preheat the oven to 350 degrees Fahrenheit. Line a 9×13 inch baking pan with parchment.
  2. In a large bowl, mix one cup of the coconut oil with the Swerve or Truvia, almond extract, orange zest, and Chinese Five Spice powder until well blended.
  3. Stir in the eggs, beating until well-combined.
  4. Stir in the almond flour and the sea salt, mixing until well combined.
  5. Spread the dough evenly in the prepared baking pan. Bake in the preheated oven until the cookies brown slightly around the edges (the top won’t brown), and the dough doesn’t have much give on the top, about 30 minutes. Cool for ten minutes.
  6. Lift the cookies out of the pan by lifting the parchment. Allow the cookies to cool completely on a wire rack.
  7. In a small saucepan, combine the remaining two tablespoons of coconut oil and the chocolate. Cook, stirring constantly, on low heat until the chocolate melts. Stir in the stevia a few drops at a time until you achieve the desired sweetness. The cookies are quite sweet, so I made my chocolate only lightly sweet to serve as a slightly bitter counterpoint to the sweetness of the cookies.
  8. Spread the chocolate in a very thin layer (or drizzle it artistically) on the cookies. Allow the chocolate to sit at room temperature for about 20 minutes to harden the chocolate slightly. Then, cut the cookies into small bars and transfer them to plates. Refrigerate to completely harden the chocolate.

Since I don’t eat a lot of sweet stuff, I’m keeping these cookies in the freezer, at the ready for when I need a sweet treat, or when I just want a taste of something completely different.

Low-Carb Pumpkin Bourbon Cheesecake Bars with Chinese Five-Spice

by Karen FrazierPumpkin cheesecake bars

I used to bake all the time. Since we’ve been on the whole paleo/low-carb diet, however, baking has gone by the wayside. Not because there aren’t good paleo and low-carb baking recipes out there, but just because I don’t really see the need to have a lot of tempting desserts around the house. If they’re there, I’ll eat them.

However, today is Jim’s birthday. He used to love my Pumpkin and Caramel Whiskey Cheesecake with Chinese Five-Spice. He has been expressing sadness that he can never, ever have that again. So I decided to do a little adaptation. While I couldn’t find a way to make it paleo, I did find a way to make it low-carb. So here is the recipe with a low-carb makeover.

For the crust

  • 1/2 stick (1/4 cup) unsalted butter
  • 1/2 cup pecans (1 3/4 ounces)
  • 1/2 cup almonds
  • 1/2 cup Swerve sweetener or Truvia
  • 1/4 teaspoon Chinese five spice

For the filling

  • 1 1/2 cups canned solid-pack pumpkin
  • 3 large eggs
  • 1 cup Swerve sweetener or Truvia
  • 2 tablespoons heavy cream
  • 1 teaspoon vanilla
  • 1 1/2 tablespoons bourbon
  • 1 tablespoon arrowroot powder
  • 1 teaspoon cinnamon
  • 1/2 teaspoon Chinese five spice
  • 1/2 teaspoon freshly grated nutmeg
  • 1/2 teaspoon ground ginger
  • 1/2 teaspoon salt
  • 3 (8 oz) packages cream cheese, at room temperature

For the topping

  • 2 cups sour cream
  • 2 tablespoons Swerve sweetener or Truvia
  • 2 tablespoons bourbon

For the pecans

  • 1 tablespoon butter
  • 1 cup pecan halves
  • 1 teaspoon cinnamon
  • 1 teaspoon Chinese five spice
  • 1/2 cup Swerve sweetener or Truvia

Instructions

  1. Preheat oven to 350 degrees.
  2. Butter a 9×13 inch baking pan.
  3. Melt 1/4 cup butter in a saute pan over medium heat, swirling the pan occasionally. When the butter begins to brown and smells slightly toasty, remove from heat and cool.
  4. Combine remaining crust ingredients in a food processor, pulsing for 10 one second pulses until fine crumbs form.
  5. Add butter to crust and pulse for five one second pulses.
  6. Press crust into bottom of prepared pan and refrigerate while you make the filling.
  7. Combine all filling ingredients in a large food processor. Process until well combined, scraping sides down occasionally.
  8. Pour filling over crust, using a rubber spatula to spread it evenly.
  9. Bake at 350 for 30 to 35 minutes, until the center sets.
  10. Cool on a wire rack for five minutes. Leave the oven on.
  11. Meanwhile, combine the topping ingredients, whisking to combine.
  12. Spread over the bars and return to oven. Bake an additional five minutes.
  13. Cool for two hours on a wire rack and then refrigerate for three hours. Top with spiced pecans (below).
  14. For pecans, melt butter over medium heat in a saute pan.
  15. Add pecans and cook, stirring, until they smell toasty, about five minutes.
  16. In a small bowl, combine sweetener, cinnamon, and five spice powder.
  17. Toss hot pecans in sweetener mixture.
  18. Use the pecans to garnish top of the bars.

photo credit: Pumpkin Cheesecake Bite via photopin (license)

Banana Bread with Brown Sugar Rum Cinnamon Glaze

Bananas foster breadWe usually wind up with a lot of overripe bananas in our house. I don’t eat them (heartburn), Tanner dislikes them, and Jim loves them, but only eats them when they’re very green. As a result, the bananas often wind up getting too ripe for Jim. Once that happens, I just let them go until they are darkly speckled. That’s when I bake banana bread.

Today I had a batch of bananas that were overripe, and I mentioned to Jim I’d be making banana bread for him to take to work.

“Can you make Bananas Foster bread?” he asked.

After thinking about it for a few minutes, I decided I probably could. I just needed to make really moist banana bread with a strong banana flavor and glaze it with some kind of a rum, brown sugar, and cinnamon glaze.

I started with Cooks Illustrated’s “Ultimate Banana Bread” recipe knowing it packed a powerful bit of banana flavor. Then, as it cooled, I got to work on my Bananas Foster Glaze. I realize some of the steps in the recipe seem kind of odd, but they really pay off in getting great banana flavor without weighting down the loaf. Of course, you could also make your own favorite banana bread recipe and then just use the glaze.

Here’s the recipe.

For the bread…

Ingredients

  • 5 very ripe bananas, peeled
  • 1 3/4 cups flour
  • 1 teaspoon baking soda
  • 1/4 cup light brown sugar
  • 8 tablespoons melted unsalted butter, slightly cooled
  • 2 large eggs
  • 1 teaspoon vanilla

Method

  1. Place peeled bananas in a large bowl. Cover with plastic wrap and cut a few slits into the plastic.
  2. Microwave the bananas on high until they release all their juices, about four to five minutes.
  3. Place a fine mesh strainer over a bowl and pour bananas and liquid into the strainer.
  4. Allow it to sit for 15 minutes, stirring it occasionally. The liquid from the bananas should collect in the bowl.
  5. As the bananas sit, heat your oven to 350 degrees. Spray a 8-1/2 x 4-1/2 inch bread pan with nonstick cooking spray.
  6. In a large bowl, whisk together flour, baking soda, and salt.
  7. Put the bananas in a medium sized bowl. Pour the liquid from the bananas into a small saucepan.
  8. Simmer the banana liquid until it is reduced to 1/4 cup.
  9. Pour the liquid from pan back into cooked bananas and stir until well combined, mashing the bananas to make them smooth. Set aside the pan you used to cook the banana juice to use when making the glaze (the remaining banana flavor will help flavor your glaze).
  10. To the bananas, add brown sugar, butter, eggs, and vanilla. Whisk until well combined.
  11. Pour the banana mixture into flour mixture and fold carefully until just combined.
  12. Pour the batter into your prepared bread pan.
  13. Bake until a toothpick inserted into the banana bread comes out clean, about 55 minutes to an hour.
  14. Allow the bread to cool on a wire rack for about ten minutes, and then remove it from the pan. Cool completely before glazing.

To make the glaze:

Ingredients

  • 6 tablespoons unsalted butter
  • 3/4 cup packed brown sugar
  • 2 tablespoons heavy cream
  • 2 tablespoons dark rum
  • 1/2 teaspoon cinnamon
  • 1/2 teaspoon salt

Method

  1. Stirring constantly, heat butter and sugar over medium heat in a saucepan until the brown sugar dissolves.
  2. Add cream, rum, cinnamon, and salt.
  3. Bring to a complete boil, stirring constantly.
  4. Remove the mixture from the heat and allow to cool until the glaze has thickened.
  5. Place the cooled banana bread on a piece of parchment paper.
  6. Pour glaze over banana bread.
  7. Allow the glaze to set, and then carefully move banana bread to a plate to cut and serve.

Ham and Cheese Crescent Rolls

Ham and cheese crescent rollI spend a lot of time trying to come up with interesting lunch items for my son. I’ve long been dissatisfied with school lunches, and so has he. This year, I’ve been making his lunches for the week on Sundays so I don’t have to worry about it for the rest of the week. I like this recipe because it takes care of a side dish for Sunday dinner, and it provides lunches for a week (the recipe makes eight crescent rolls and eight ham and cheese rolls.

If you don’t want to make your own crescent roll dough, you can always use refrigerated crescent rolls, although they aren’t nearly as flavorful and they’re pretty small.

A quick tip on baking – I prefer regular yeast to rapid rise yeast. The reason is I believe that a dough that rises more slowly has time to develop better flavors. You can use a quick rise yeast, which will cut the rising time by about half. You can also replace the shortening with softened butter, although shortening gives the rolls a more tender crumb. If you like, you can sprinkle the ham and cheese rolls with a bit of cheese before baking.

Ham and Cheese Crescent Rolls

  • 2 packages active dry yeast
  • 3/4 cup warm water at 110 degrees Fahrenheit
  • 1/2 cup sugar
  • 1 teaspoon salt
  • 2 eggs
  • 1/2 cup shortening
  • 4 cups flour plus more for kneading and rolling
  • 1/4 cup unsalted butter, very soft
  1. Dissolve yeast in warm water in small bowl.
  2. In a medium sized bowl, combine sugar, salt, eggs, and shortening. Use a mixer to beat on high speed until all ingredients are combined.
  3. Add yeast mixture and flour. Stir until a smooth dough forms.
  4. Turn dough out on a well-floured surface and knead until dough is springy and elastic, about 10 minutes.
  5. Place in an oiled bowl, turning to coat dough in oil.
  6. Cover and allow dough to rise in a warm spot until doubled, about 90 minutes.
  7. Punch down dough. Divide into two equal balls.
  8. Roll out each ball on a floured surface into a round that is about 1/4 inch thick.
  9. Spread each round with half of the softened butter.
  10. On one round of dough, lay out slices of deli ham to cover the entire round. Sprinkle with grated cheese.
  11. Cut the rounds into eight wedges (pizza style). Roll each wedge into a crescent roll from the wide end to the point.
  12. Place rolls on parchment lined baking pans. Cover and allow to rise for an hour, until rolls are doubled in size.
  13. Heat oven to 400 degrees Fahrenheit.
  14. Bake rolls for 12 to 15 minutes, until cooked through and golden brown on the outside.

Pumpkin Cheesecake with Caramel Whiskey and Chinese Five Spice Pecans

pumpkin cheesecake with sour cream topping Jim’s favorite dessert in the entire world is cheesecake. Several years ago, I baked Gourmet Magazine’s Pumpkin Bourbon Cheesecake, and it instantly became his new favorite. Over the years, I’ve tweaked the recipe little by little until it has taken its present (delicious) form.

For the crust

  • 1/2 stick (1/4 cup) unsalted butter
  • 3/4 cup graham cracker crumbs (about five graham crackers – use S’moreables gluten-free graham style crackers for GF)
  • 1/2 cup pecans (1 3/4 ounces),  finely chopped
  • 1/4 cup packed light brown sugar
  • 1/4 cup granulated sugar
  • 1/4 teaspoon Chinese five spice

For the filling

  • 1 1/2 cups canned solid-pack pumpkin
  • 3 large eggs
  • 1/2 cup packed light brown sugar
  • 2 tablespoons heavy cream
  • 1 teaspoon vanilla
  • 1 tablespoon caramel whiskey (Black Velvet or other)
  • 1/2 cup granulated sugar
  • 1 tablespoon cornstarch
  • 1 teaspoons cinnamon
  • 1/2 teaspoon Chinese five spice
  • 1/2 teaspoon freshly grated nutmeg
  • 1/2 teaspoon ground ginger
  • 1/2 teaspoon salt
  • 3 (8 oz) packages cream cheese, at room temperature

For the topping

  • 2 cups sour cream
  • 2 tablespoons granulated sugar
  • 1 tablespoon Black Velvet caramel whiskey

For the pecans

  • 1 tablespoon butter
  • 1 cup pecan halves
  • 1 teaspoon cinnamon
  • 1 teaspoon Chinese five spice
  • 1/2 cup sugar

Instructions

  1. Preheat oven to 350 degrees.
  2. Butter a 9″ spring form pan.
  3. Melt 1/4 cup butter in a saute pan over medium heat, swirling the pan occasionally. When the butter begins to brown and smells slightly toasty, remove from heat and cool.
  4. Combine remaining crust ingredients in a food processor, pulsing for 10 one second pulses until fine crumbs form.
  5. Add butter to crust and pulse for five one second pulses.
  6. Press crust into bottom of prepared pan and refrigerate while you make the filling.
  7. Combine all filling ingredients in a large food processor. Process until well combined, scraping sides down occasionally.
  8. Pour filling over crust. Tap pan lightly against counter to remove air pockets.
  9. Place pan on a rimmed baking sheet to catch any leaks. Bake at 350 for 20 to 30 minutes, until sides are set but middle still slightly jiggles.
  10. Cool cheesecake on a wire rack for five minutes. Leave oven on.
  11. Meanwhile, combine topping ingredients, whisking to combine.
  12. Spread over cheesecake and return to oven. Bake an additional five minutes.
  13. Cool for two hours on a wire rack and then refrigerate for three hours before umolding. Top with spiced pecans (below).
  14. For pecans, melt butter over medium heat in a saute pan.
  15. Add pecans and cook, stirring, until they smell toasty, about five minutes.
  16. In a small bowl, combine sugar, cinnamon, and five spice powder.
  17. Toss hot pecans in sugar mixture.
  18. Use pecans to garnish top of the cheesecake.

Perfect Lemon Bars

lemon barsOne of my all-time favorite childhood treats is lemon bars. When made well, they are sweet and citrusy. They taste like sunshine.

There are two secrets to excellent lemon bars – a crumbly short crust and a smooth lemony curd that’s not too sweet. Often, I tweak recipes to make them  my own, but in this case I actually found lemon bar perfection from Cooks’ Illustrated’s Baking Illustrated. When I can find them, I use Meyer lemons for the curd. Otherwise, I pretty much follow the recipe exactly as is because it is nearly perfect.

One hint – don’t sprinkle powdered sugar until just before serving, or it will likely melt into the bars.

Here’s the link to the recipe.

I think this lemon curd (doubled recipe) would be perfect in lemon meringue pie, as well.

Cinnamon Rolls

cinnamonrollsThese are incredibly moist and freeze well in an airtight container. The rolls are giant, and the batch is large, so sharing is always a great option.

Rolls

  • 1 cup hot mashed white potatoes
  • 2 cups milk
  • 7 cups (or more) flour
  • 1-2 packages quick rise yeast
  • 1 cup softened butter
  • 1 cup sugar
  • 1-1/2 teaspoons salt
  • 4 large eggs

Filling

  • 2 sticks butter, softened
  • 2 cups brown sugar
  • Cinnamon to taste

Icing

  • 1 package softened cream cheese
  • 1 teaspoon vanilla
  • 1 pound sifted powdered sugar
  • 3 tablespoons milk (0r more to achieve desired consistency)
  1. Combined potatoes, milk, and one cup of flour in a large glass bowl.
  2. Beat until well combined.
  3. Cool to lukewarm (about 110 degrees) and stir in yeast.
  4. Cover and let rise until light, about 30 minutes.
  5. Preheat oven to 200 degrees and then turn off.
  6. Stir down mixture with a wooden spoon.
  7. In another bowl, cream butter and sugar.
  8. Add salt and eggs and beat until blended.
  9. Stir butter, sugar, salt, eggs mixture into yeast mixture.
  10. Add remaining flour to make a firm dough.
  11. Knead until elastic, about 10-15 minutes.
  12. Grease an ovenproof bowl with butter.
  13. Put dough in bowl.
  14. Cover with a warm damp cloth and place in warmed oven (make sure it has been turned off) to rise – about 1-1/2 to 2 hours.
  15. Punch down dough.
  16. Turn onto a floured surface.
  17. Spread softened butter onto dough and top with brown sugar and cinnamon.
  18. Roll dough into a large log and cut into cinnamon rolls.
  19. Place in a greased pan.
  20. Allow to rise for 30 minutes.
  21. Meanwhile, preheat your oven to 375 degrees.
  22. Bake risen rolls for 30 minutes.
  23. Allow rolls to cool.
  24. Cream together cream cheese and powdered sugar.
  25. Add milk and vanilla to desired consistency.
  26. Use to ice rolls.