Chocolate Nut Butter Fudge

fudgeby Karen Frazier

I bought a few cans of coconut milk the other day and found, as often happens, the coconut milk had separated into cream at the top of the can with the water condensing in the bottom. This separation of the solids and liquids, I realized, is the perfect way to add a creamy element to a lot of different foods.

My first thought was using these coconut milk solids (the coconut cream) to make icing, since they had a texture similar to chilled butter, albeit a bit creamier and less dense. However, I didn’t feel like messing with paleo flours to bake a cake or brownies, but I still wanted to mess around with the cream a bit.

Then it hit me. If I mixed the coconut cream with a nut butter and some melted chocolate, it would develop a fudge-like consistency. Or that was my hope. So I gave it a try, and it worked. The result was a creamy, low-carb, vegan, paleo, tasty fudge with the perfect texture and the exact right level of sweetness.

You’ll need to use canned coconut milk here – the full-fat kind, not lite coconut milk. Usually you can tell if the solids and liquids have separated by giving the can a shake and listening. There won’t be a liquid sloshing sound. If, for some reason, it hasn’t separated, then you can refrigerate the unopened can overnight, which should do the trick.

The cans of coconut milk where this is most likely to happen are those without any additives or emulsifiers – so check the ingredients and make sure it only lists coconut cream and water. This is the type that is most likely to separate.

When you open the can, pour away the water and use a rubber spatula to scrape all of the solid coconut cream out. Some stores also sell coconut cream, and you can use that, as well.

Choose a nut butter that works with your diet. If you’re paleo, sugar-free, organic almond butter works well here. If you’re not paleo, then use organic, sugar-free peanut butter instead. I don’t specify an amount of liquid stevia (for paleo), or liquid sucralose (for non-paleo, low-carb) because sweetness preferences vary. I tend to like my dessert not very sweet, so I don’t add a lot of sweetener. To get the right amount of sweetness, add a bit of the liquid sweetener (5-10 drops), taste, add more, taste – and continue until you reach the desired sweetness level.

Chocolate Nut Butter Fudge

  • 2 ounces unsweetened dark, vegan chocolate
  • 1/3 cup nut butter
  • 1 (14-ounce) can full-fat coconut milk, drained or 3/4 cup unsweetened coconut cream
  • 1 teaspoon vanilla
  • Liquid stevia or liquid sucralose to taste
  1. Line an eight-inch square pan with parchment.
  2. In your microwave or on the stove, melt the nut butter and chocolate. If melting on the stovetop, do it on low heat and stir frequently. In the microwave, cook on high for 30 seconds, stir, and repeat until smooth.
  3. In a medium-sized bowl or stand mixer, beat the melted chocolate and nut butter, coconut cream, vanilla, and sweetener until smooth. Taste and add more sweetener as desired.
  4. Pour into the prepared pan using a rubber spatula to spread it in an even layer. Freeze for one hour. Cut into squares, and store the fudge in a zipper bag in the fridge or freezer.

photo credit: Coffee Fudge via photopin (license)

Low-Carb Chocolate Peanut Butter Cheesecake

IMG_1460by Karen Frazier

When I take a day off from paleo, it’s often for dairy foods. However, I always try to keep carbs deeply in check and still use the healthiest forms of the ingredients I can find. So while I may occasionally make, oh….say….a cheese cake, I make it as low in carbs as possible. I also do it infrequently – once or twice a year – so when I do, it’s a real treat.

Jim’s favorite low-carb cheesecake is a pumpkin-bourbon cheesecake with Chinese five spice powder, but I love peanut butter. So I thought I’d try to make a cheesecake that has peanut butter cup flavors, but keep it relatively low-carb.

Ingredients

For the crust:

  • 3/4 cup pecans
  • 3/4 cup peanuts
  • 3/4 cup Swerve sweetener, Truvia (the kind without sugar), or erythritol
  • 3 tablespoons unsweetened cocoa powder
  • 3 tablespoons grass-fed butter

For the filling:

  • 4 (8 ounce) packages grass-fed cream cheese, softened
  • 4 eggs
  • 1 cup organic peanut butter
  • 1/4 cup grass-fed sour cream
  • 2 teaspoons vanilla
  • 1 1/2 cups Swerve sweetener, Truvia (not the baking blend, which has sugar), or erythritol

For the topping:

Instructions

For the crust:

  1. Preheat your oven to 350 degrees Fahrenheit. Grease a 9-inch spring-form pan with grass-fed butter on the bottom and sides.
  2. In a food processor, pulse the pecans, peanuts, sweetener, and cocoa powder for ten one-second pulses.
  3. Add the butter and pulse for ten more one-second pulses.
  4. Press the mixture into the bottom of the prepared spring form pan and set aside.

For the filling:

  1. In a stand mixer, food processor, or a large bowl (you can use an electric mixer to mix), combine all of the filling ingredients. Process or mix until smooth.
  2. Pour into the prepared spring form pan, spreading it over the top of the crust.
  3. Bake in the preheated oven until the middle is set, 50 to 55 minutes.

For the topping:

  1. In a small bowl, beat the sour cream, peanut butter, and sweetener until smooth.
  2. Spread the mixture evenly over the top of the cheesecake as soon as it comes out of the oven. Return the cheesecake to the oven for five minutes.
  3. Cool the cheesecake on a wire rack for two hours.
  4. In a small bowl, mix together the chopped peanuts and the chocolate chips.
  5. Sprinkle evenly over the topping.
  6. Run a butter knife around the inside edge of the pan.
  7. Release the cheesecake from the spring form. Refrigerate for two more hours.

Orange-Almond Spice Cookie Bars

IMG_0908by Karen Frazier

I have always been a baker. Puttering around in the kitchen baking stuff is one of my favorite ways to while away an autumn weekend afternoon while Jim watches football. With the celiac disease and my low-carb, paleo diet, however, I stopped engaging in that love. It’s only been recently that I’ve started tinkering with baking once again.

This recipe came to me in a flash of inspiration a few days ago, and I decided last night to give it a try. I was worried about lots of things – tweaking ratios, etc., but the cookies came out really well on the first try. Feel free to mess around with the flavor profiles. I love the way the orange, spice, almond, and chocolate blend in this tasty recipe.

The cookies are paleo-ish – the erythritol in the sweetener renders them not quite paleo; however, if you aren’t baking low-carb, you can replace the sweetener with coconut sugar. It will raise the carb count, but keep the cookies paleo. So it’s a matter of blood sugar vs. staying totally paleo.

Orange-Almond Spice Cookie Bars

  • 1 cup plus 2 tablespoons coconut oil, melted
  • 1 cup Swerve Sweetener or Truvia (for low-carb) or coconut sugar (for paleo)
  • 3/4 teaspoon almond extract
  • Zest of one orange
  • 1 teaspoon Chinese Five Spice powder
  • 2 eggs
  • 2 cups almond meal flour
  • 1/2 teaspoon sea salt
  • 6 ounces unsweetened dark chocolate
  • Liquid stevia, to taste
  1. Preheat the oven to 350 degrees Fahrenheit. Line a 9×13 inch baking pan with parchment.
  2. In a large bowl, mix one cup of the coconut oil with the Swerve or Truvia, almond extract, orange zest, and Chinese Five Spice powder until well blended.
  3. Stir in the eggs, beating until well-combined.
  4. Stir in the almond flour and the sea salt, mixing until well combined.
  5. Spread the dough evenly in the prepared baking pan. Bake in the preheated oven until the cookies brown slightly around the edges (the top won’t brown), and the dough doesn’t have much give on the top, about 30 minutes. Cool for ten minutes.
  6. Lift the cookies out of the pan by lifting the parchment. Allow the cookies to cool completely on a wire rack.
  7. In a small saucepan, combine the remaining two tablespoons of coconut oil and the chocolate. Cook, stirring constantly, on low heat until the chocolate melts. Stir in the stevia a few drops at a time until you achieve the desired sweetness. The cookies are quite sweet, so I made my chocolate only lightly sweet to serve as a slightly bitter counterpoint to the sweetness of the cookies.
  8. Spread the chocolate in a very thin layer (or drizzle it artistically) on the cookies. Allow the chocolate to sit at room temperature for about 20 minutes to harden the chocolate slightly. Then, cut the cookies into small bars and transfer them to plates. Refrigerate to completely harden the chocolate.

Since I don’t eat a lot of sweet stuff, I’m keeping these cookies in the freezer, at the ready for when I need a sweet treat, or when I just want a taste of something completely different.

Asian Cucumber “Noodle” Salad

Cucumber

by Karen Frazier

They had beautiful cucumbers at the farmers market this week, so I picked up a few. I find cucumbers really refreshing – particularly in the summer. I love their slight acidity, which adds balance to fatty or rich cuts of meat, such as pork belly. I also picked up some cilantro, red scallions, and red heirloom carrots.

I have a spiralizer that I love to use to turn veggies into noodles, so I knew immediately what I wanted to do with this combination of farmer’s market veggies. I wanted to spiralize them into cold, crunchy “noodles” and then toss them with an Asian-inspired vinaigrette.

If you don’t have a spiralizer, you can use a vegetable peeler and cut the cucumbers and carrots into long, wide strips. You can use a paring knife to cut the strips into “noodles” or you can leave them as wide strips. It’s up to you.

Cold Cucumber “Noodle” Salad

  • 2 cucumbers, spiralized or cut into noodles
  • 2 large carrots, spiralized or cut into noodles
  • 3 scallions, thinly sliced
  • 1/4 cup cilantro, chopped
  • 1/4 cup extra-virgin olive oil
  • 1/4 cup rice vinegar
  • Juice of one orange
  • Zest of 1/2 orange
  • 1/2 teaspoon sea salt
  • 1/4 teaspoon black pepper
  • 1/2 teaspoon grated ginger
  • 1 garlic clove, minced
  • 1 teaspoon sriracha (or 1/4 teaspoon red pepper flakes for Whole30)
  • 1/2 teaspoon cold pressed sesame oil
  1. In a large bowl, combine the cucumbers, carrots, scallions, and cilantro.
  2. In a small bowl, whisk together the olive oil, vinegar, orange juice, orange zest, sea salt, pepper, ginger, garlic, sriracha, and sesame oil.
  3. Toss the vinaigrette with the vegetables and serve cold.

spiralizer cover

(image license)

For more spiralizer recipes, check out the Healthy Spiralizer Cookbook, which I wrote for Rockridge Press.  It contains an array of veggie based “noodle” recipes using a spiralizer. I really like my Paderno World Cuisine Spiralizer, which works like a pro with many vegetables.

If you’re trying to cut down on carbs, or if you just want to find a great way of adding noodles to your diet without the gluten, a spiralizer is a wonderful choice. I like making zucchini noodles into pasta, that I can then toss with all types of Italian sauces. You can also make soups, salads, and an array of other tasty vegetable and fruit dishes.

Quick Pickles

picklesMy family would probably tell you I’m obsessed with pickles. I. Love. Them. Every year I wait for cucumber season and watch for pickling cucumbers at the farmers’ market so I can enjoy homemade pickles. I like them garlicky with a touch of heat. These refrigerator pickles are great because they are quick and require no canning. We go through pickles pretty quickly in our house, so I do them in 2 pound batches in a crock.

Zesty Refrigerator Dill Pickles

  • 3 cups white wine vinegar
  • 3 cups water
  • 2 pounds pickling cucumbers, cut into spears
  • 4 tablespoons pickling salt
  • 1/2 red onion, thinly sliced
  • 12 cloves garlic, crushed
  • Small bunch fresh dill
  • 1 tablespoon cracked peppercorns
  • 1/2 teaspoon pepper flakes (or to taste)
  1. Boil vinegar, water, and salt in a saucepan to dissolve salt.
  2. Layer cucumbers, onion, garlic, dill and peppercorns in a large crock.
  3. Pour hot brine over cucumbers. Add pepper flakes.
  4. Allow to sit, uncovered, on the counter until pickles are room temperature.
  5. Cover and refrigerate for three days before eating.

I also like to do a quick pickle to red onions. It removes some of the bite from onions, and the result is delicious on burgers or salads. Tonight, I’m making a quick pickled onion to put on top of Mediterranean spiced lamb burgers.

Red Onion Quick Pickle

  • 1/2 cup red wine vinegar or apple cider vinegar
  • 1 tablespoon sugar
  • 1 1/2 teaspoons kosher salt
  • 1 thinly sliced red onion
  1. Combine sugar, salt, and vinegar in a small bowl and whisk until sugar and salt dissolves.
  2. Arrange red onions in a small bowl.
  3. Pour brine over onions.
  4. Sit at room temperature for one hour.
  5. Cover and refrigerate.

Nut Butter Noodles

PBNoodlesWhether you like peanuts, almonds, or cashews, making noodles with a nut butter sauce makes a fast and delicious week night meal. I’ve made these with peanut, cashew, and almond butter, and they are equally delicious served hot or cold.

  • 1 package spaghetti noodles, cooked according to package directions (or soba noodles or rice noodles for gluten-free)
  • 1/2 cup sugar-free nut butter (peanut, almond, or cashew)
  • 1 clove garlic
  • 1-1/2 teaspoons grated ginger root
  • 6 scallions, sliced
  • 3 tablespoons rice vinegar
  • 3 tablespoons sesame oil
  • 1/4 cup gluten-free soy sauce
  • 1/4 cup coconut milk
  • Sriracha or chili oil to taste
  • Salt to taste
  • 3 tablespoons sesame seeds
  1. Cook spaghetti or other noodles (such as udon or ramen) according to package directions and drain them.
  2. Meanwhile, in a food processor, pulse garlic, ginger, and 4 scallions until thoroughly chopped (set aside remaining two scallions).
  3. Scrape down vegetables from side of food processor and add nut butter, rice vinegar, sesame oil, soy sauce, coconut milk, and sriracha. Pulse food processor to blend.
  4. Taste and add salt or more sriracha as necessary.
  5. Toss sauce with hot noodles and add sesame seeds and remaining two sliced scallions.
  6. Serve hot or cold.

Variations:

  • Add cooked marinated chicken or other meat.
  • Add steamed veggies such as broccoli.
  • Replace soy sauce with teriyaki sauce for a sweeter sauce.
  • Add your favorite curry.
  • Garnish with chopped nuts or bean sprouts to vary textures.

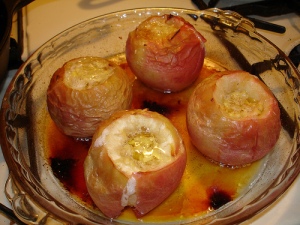
Baked Apples

bakedapple

  • 4 apples, cored with tops cut off
  • 1/4 cup brown sugar
  • 1/4 cup butter (coconut oil for dairy-free)
  • Cinnamon to taste
  • 1/2 cup apple juice
  1. Preheat oven to 350.
  2. Place apples in a square pan with cut core up.
  3. Place 1 tablespoon brown sugar in each core hole.
  4. Top each with 1 tablespoon butter.
  5. Sprinkle with cinnamon.
  6. Add apple juice to pan.
  7. Cover with foil and bake at 350 for one hour.

Orange Vanilla Sweet Potatoes

  • sweettater4 sweet potatoes or yams, peeled and cut into wedges
  • 1/4 cup melted butter (coconut oil for dairy-free and vegetarian)
  • 1 vanilla bean, halved lenthwise
  • Zest from one orange
  • Juice from two oranges
  • Fresh grated nutmeg, salt, and fresh cracked black pepper to taste
  1. Preheat oven to 350 degrees.
  2. Scrape seeds from vanilla beans into melted butter and add seed pods.
  3. Toss butter/vanilla with potatoes.
  4. Roast until potatoes are soft – about 45 minutes to an hour.
  5. Remove potatoes from butter and set aside, tented with foil.
  6. Carefully pour butter from pan into a small saucepan with orange juice and zest.
  7. Simmer over medium heat until reduced by half and syruppy.
  8. Toss with potatoes.
  9. Season with fresh grated nutmeg, salt, and pepper to taste.

Roasted Root Veggies

sweetpotatoesThese aren’t your traditional sweet, sticky potatoes. Instead, they are a simple roast of julienned potatoes that bring out the slightly sweet, nutty flavor of the potatoes.

  • 1-2 sweet potatoes, peeled and julienned.
  • 2-4 Yukon gold potatoes, peeled and julienned
  • 3 tablespoons olive oil
  • 2-4 shallots, thinly sliced
  • 3 tablespoons chopped, fresh thyme
  • 2-4 tablespoons minced red onion
  • 1 clove garlic, put through garlic press
  • 1 tablespoon butter, melted (eliminate for dairy-free)
  • Salt and fresh cracked black pepper to taste
  1. Heat oven to 400 degrees.
  2. In a large roasting pan, toss potatoes and sweet potatoes with olive oil, shallots, thyme, and onion.
  3. Spread in a thin layer across the bottom of the pan.
  4. Roast for 20 minutes until brown.
  5. Remove from onion and toss with butter, garlic, salt, and pepper.

Braised Belgian Endive

endiveThis recipe comes out sweet and nutty. It’s a great simple vegetable side dish.

  • 2 heads Belgian endive per person, sliced lengthwise into two pieces
  • 3 tablespoons butter (or olive oil for dairy-free)
  • 2 teaspoons sugar
  • Salt and fresh cracked black pepper to taste
  • Juice of one lemon
  • 1/4 cup gluten-free chicken stock
  • 1/4 cup white wine
  1. Heat a small amount of butter in a skillet over medium heat until bubbly.
  2. Sprinkle sugar into butter evenly over surface of skillet.
  3. Place endive in pan, cut side down.
  4. Cook 3-4 minutes until browned and then flip.
  5. Cook 3-4 minutes until brown on other side.
  6. Turn again. Add wine, chicken stock, and lemon juice.
  7. Bring to a simmer.
  8. Reduce heat and cover.
  9. Simmer until fork tender.
  10. Season with salt and pepper to taste.