Baked Apples

bakedapple

  • 4 apples, cored with tops cut off
  • 1/4 cup brown sugar
  • 1/4 cup butter (coconut oil for dairy-free)
  • Cinnamon to taste
  • 1/2 cup apple juice
  1. Preheat oven to 350.
  2. Place apples in a square pan with cut core up.
  3. Place 1 tablespoon brown sugar in each core hole.
  4. Top each with 1 tablespoon butter.
  5. Sprinkle with cinnamon.
  6. Add apple juice to pan.
  7. Cover with foil and bake at 350 for one hour.
Advertisement

Orange Creme Brulee

  • 4 cups heavy creamcremebrulee
  • Dash salt
  • 2/3 cups sugar
  • 1 vanilla bean
  • Zest of one orange
  • 12 egg yolks
  1. Pour 2 cups of heavy cream in a saucepan.
  2. Split vanilla bean in half and scrape out seeds. Put seeds and pods into cream in pan.
  3. Add sugar, salt, and orange zest.
  4. Heat to boiling over medium heat, stirring constantly.
  5. When cream boils, remove from heat and allow to steep for 15 minutes.
  6. Preheat oven to 300 degrees.
  7. Add remaining 2 cups of cream to steeped cream.
  8. Crack egg yolks into a bowl and whisk.
  9. Whisk cream mixture into yolks.
  10. Strain mixture through a fine mesh sieve into eight 4 to 5 ounce ramekins.
  11. Place ramekins in a 9 x 13 cake pan lined with a towel.
  12. Place pan in oven.
  13. Pour several cups of boiling water into the cake pan, being careful not to splash it into ramekins.
  14. Bake for 25-30 minutes, until custard is set in center but still wiggles around the middle.
  15. Remove from water bath to a wire rack. Cool to room temperature for about 2 hours.
  16. Cover with plastic wrap and place in refrigerator overnight.
  17. Sprinkle the tops of custards with about 1 teaspoon of sugar and caramelize with a kitchen torch.

Hazelnuss Kranz (Hazelnut Ring)

hazelnutThis past week, a friend of mine posted a picture of Haselnuss-Kranz on her Facebook page and it looked delicious. It’s a German dessert made of a sweet shortcrust rolled around a sweetened hazelnut filling and rolled into a ring. Living as close to Oregon as we do, we’re huge hazelnut fans, so I sought to find the recipe. What I found is that it is so German, English language recipes are difficult to find. Finally, I found a recipe by Nigella Lawson, which I began to fiddle with. Nigella’s recipe is written in grams – easy with a kitchen scale but a little more difficult if you you don’t have one. I used my kitchen scale for exact measurements, but I’ve converted here for your ease (and Americanized the recipe slightly).


German Hazelnut Ring

Crust

  • 2 cups flour
  • 2 tsp baking powder
  • 3/4 cups sugar
  • 1 tbsp. vanilla
  • 1 egg
  • 2 tbsp. milk
  • 1 stick butter, very cold and cut into cubes

Filling

  • 1-1/2 cups hazelnuts, finely ground
  • 1/2 tsp. almond extract
  • 4 tbsp. evaporated milk
  • 3/4 cup sugar
  • 1 egg white

Glaze

  • 1 egg yolk
  • 1 tbsp. evaporated milk
  1. Preheat the oven to 350 degrees.
  2. Sift flour, sugar, and baking powder into the bowl of a food processor.
  3. Add butter and liquids, sprinkling evenly over the top of the ingredients.
  4. Pulse the food processor for 10 one-second pulses until mixture resembles wet sand
  5. Pour mixture onto a clean surface (I use a Silpat) and pull it together in a ball, kneading a few times to make sure mixture is smooth.
  6. Refrigerate the dough wrapped in plastic for 20 minutes.
  7. Meanwhile, grind hazelnuts finely in the food processor with ten one second pulses.
  8. Pour hazelnuts in a bowl with remaining filling ingredients and mix well.
  9. Roll short crust into a rectangular shape that is about 11″ x 15″.
  10. Spread filling over pastry and roll the pastry length-wise.
  11. Shape pastry into a ring and place on a parchment paper lined cookie sheet.
  12. Mix together glaze and spread over top of ring.
  13. Using a knife, score the pastry with X or star shapes in several spots.
  14. Bake for 45 minutes until golden brown.

Baking Bread

breadYeast breads have a reputation for being notoriously difficult, because they take the better part of a day to create. However, I adore baking yeast breads. There is something very zen about kneading the dough until it changes under your hands, becoming smooth and elastic. Every year, I bake my family a big batch of cinnamon rolls with cream cheese frosting that are absolutely delicious. I use potatoes and flour to make a sponge for the yeast, which leaves the dough very moist and delicious. I also like to make rolls, pizza crust, focaccia, and all kinds of other breads. Today, I’ve got rosemary and sea salt bread rising on my counter top as I type this. But I digress…

Basic Bread Dough Proportions

Baking bread is not nearly as difficult as it sounds if you’ve got the time to spare.

  • A basic bread yeast dough contains (by weight) 5 parts flour to 3 parts water, plus salt, yeast, and other ingredients you may wish to add.
  • If you want to make a loaf of bread out of three cups of flour (each cup is about 4 oz), then you will need about  7 0z of water or some other liquid.
  • I like to use about 5 oz of water and 2 oz of milk just to add richness to the dough.
  • To that, add about a teaspoon of yeast and toss in a little salt (1/4-1/2 teaspoon).

Bread Baking Technique

When making your bread, use the following techniques.

  1. Sprinkle the yeast over a few ounces of your water. Use water that is about 110 degrees, and allow it to sit until bubbles form. I often toss a little sugar or honey in this mixture just to feed the yeast a little more.
  2. Whisk together your flour and salt. Then, add the water with the yeast, as well as your remaining liquid ingredients. Stir until it forms into a loose ball.
  3. Turn the ball out onto a floured surface. You will spend the next ten minutes or so kneading the dough, which develops the glutens and makes the dough much more elastic. To knead, fold the dough over, press together with the heels of your hands, turn the dough 1/4 turn, and repeat. Continue this process, and the dough will become smooth, soft and elastic.
  4. It is virtually impossible to overknead if you are hand kneading. If you are using a mixer to knead, you can overknead. How do you know when the dough is ready? Here are several tests.
  5. Press your hand firmly on the top of the dough and hold for 30 seconds. If the dough is even remotely sticky under your hand when you remove it, you need to keep kneading.
  6. Poke the dough deeply with your finger. If the divot springs back into place, the dough is ready. If the divot remains, keep kneading.
  7. Take a small piece of the dough and gently stretch. If you can stretch it thin enough to see light shining through the dough before it breaks, it’s ready. If you can’t – keep kneading.
  8. Place the kneaded dough into an oiled bowl. Cover it with a damp towel and set aside to rise. Typically, you can allow it to rise about two hours until it doubles in size. If you use less yeast, it may take longer to rise. If you use more or rapid rise yeast, it will take longer to rise.
  9. While many people prefer the convenience of rapid rising, the slower you allow your dough to rise, the more flavor it develops. If you want a really flavorful bread, use less yeast and let it rise for several hours until it doubles in size.
  10. After rising, punch the dough down.
  11. Knead briefly again and let sit for about 20 minutes.
  12. Shape dough into your baking shape and allow it to rise again, for about 60 minutes.
  13. Preheat your oven to 450 degrees.
  14. Score the top of your loaf with a knife, and brush top with olive oil. Sprinkle with a little salt.
  15. Bake at 450 for 10 minutes. Reduce the heat to 375, and bake for 45 to 50 minutes more.

Variations

That’s your basic bread baking technique. So what can you vary? Shape. Size. Ingredients. Add some olive oil, butter, or sugar. Turn it into pizza dough – it’s up to you! Today, I’ve got a bread dough rising with chopped rosemary in it, and I will sprinkle it with coarse sea salt before I bake it. Other things you can add:

  • Roasted garlic
  • Cheeses
  • Oregano
  • Chopped rosemary
  • Thyme
  • Jalapenos
  • Honey
  • Brown sugar
  • Molasses
  • Different types of flour
  • Sesame seeds
  • Caraway
  • Poppy seeds

Some great combinations to try:

  • Roasted garlic rosemary
  • Cheddar jalapeno
  • Caramelized onions and thyme
  • Oregano and Asiago cheese

You are only limited by your imagination, once you know how to bake a basic lean bread dough.

Homemade Butterscotch Pudding

puddingWhen is the last time you had homemade pudding? Many people have never had it. I’m not talking about the kind of pudding that came as a powder in a box that you had to either cook or beat for a couple of minutes. I’m talking honest-to-goodness pudding from scratch.

Like many others, I hadn’t bothered making pudding in any way other than from a box since my high school Home Ec. Then, one day about eight years ago, I was eating some watery, tasteless butterscotch pudding from a cup, and I thought, “How hard can it be to make pudding with some flavor and texture?”

It was easy! And fast! In total, that first batch of butterscotch pudding took me about five minutes, but what a difference five minutes made. The pudding was rich, creamy, and complexly flavored. Over the years I’ve tweaked my recipe and gotten it to the perfect blend of butterscotch, salt, and a hint of vanilla. If you’ve got five minutes and you’d like to get in the wayback machine to see how real butterscotch pudding used to taste, try it. It’s pretty foolproof, and well worth the effort.


  • 3 T dark brown sugar
  • 3 T unsalted butter
  • 1/2 cup heavy cream
  • pinch salt
  • 2 cups whole milk (not 2 percent or skim)
  • 3 T corn starch
  • 3 T water
  • 1 tsp. vanilla

Method

  1. In a saucepan, melt butter and blend in brown sugar until well combined and bubbly.
  2. Stir in heavy cream until sugar/butter is dissolved.
  3. Remove from heat.
  4. Add salt and whole milk, stirring to combine.
  5. Allow to cool to lukewarm. Meanwhile, combine water and cornstarch to form a slurry.
  6. Return pudding to medium heat and slowly add the slurry, stirring constantly.
  7. Continue to stir until pudding begins to thicken and bubble around the edges.
  8. Reduce heat to medium and continue to cook, stirring for one minute.
  9. Remove from heat and stir in vanilla.
  10. Spoon pudding into custard cups and chill.

Christmas Cookies for the Baking Impaired

cookiesDo you love Christmas cookies? Are you baking impaired? I’ve got good news. These are the world’s easiest Christmas cookies, requiring very little work with an incredibly impressive result. I’ve even given these as gifts, and people believe I’ve spent hours in the kitchen baking them.

A confection of sugar cookies sandwiched together and filled with a sweet almond filling and then dipped in creamy milk chocolate, these cookies are rich and really gorgeous. And did I mention easy? Best, you can vary the simple recipe, changing the filling for raspberry or other flavors, changing the coating to white chocolate or butterscotch…you can be as creative as you’d like.

Recipe and instructions below, and I promise – simple.

You will need:

  • 1-2 rolls of refrigerated sugar slice and bake sugar cookie dough
  • 1-2 cans of almond filling (not almond paste – you can find this in the baking aisle of the grocery store)
  • 1-2 packages of almond bark (large chunks of chocolate coating in cubes you can find in the baking aisle at Christmas time)
  • Almonds for garnish
  • Parchment paper

Technique:

  1. Bake sugar cookies as described on package and cool fully.
  2. Spread a thin layer of almond filling between two cookies.
  3. Melt almond bark according to package directions. Dip cookie sandwiches in almond bark, coating completely. Set on parchment to cool.
  4. While the chocolate is still soft, garnish cookie with an almond or almond slice.

That’s it. Easy, huh?

Tips for Better Pie Crust

crustI believe the reason so many avoid baking pies is this: pie crust can be a pain in the behind. It’s hard to make it pretty and flaky – and sometimes the two seem mutually exclusive. In fact, if I have to opt for one of the other, I’m always going with flaky over pretty. I’d rather have an ugly pie that tastes good than one that looks gorgeous but has a crust like shoe leather.

The reason these two goals often seem mutually exclusive is this: the more you work with pie crust dough, the tougher it gets. Working the dough binds the glutens, resulting in a tougher pastry. Most pastries are the exact opposite of breads. With bread, you want to work the dough as much as possible to toughen up the gluten and bind it together. That’s why you knead bread dough. With pies, you want to create little bits of fat within loosely bound flour. That way, when the fat melts during the baking process, it leaves air pockets that produce flakes.

You can really use any pie dough recipe – I use Cook’s Illustrated’s recipes. What is important is that you follow a few procedures to make the dough just as flaky as possible.

  1. Handle the dough minimally. Roll it only once. Don’t re-roll it, or you will toughen it up. Likewise, only stir enough to bring the dough together. To do this, I combine butter and dry ingredients in the food processor, pulsing a few times to create a sandy mixture. Then, I pour that mixture in a small bowl and sprinkle water over the top – just enough to bring the mixture together. I lightly mix it with a rubber spatula until it forms a loose, shaggy ball, adding more water only if I need it. Your dough should not appear homogenous – just together.
  2. Use very cold butter, and cut it into 1/2″ cubes. The colder the butter, the better because this allows it to stay in small clumps within the dough that will melt away and leave flakes.
  3. Use ice water. This keeps the butter from melting before you bake the pie.
  4. Before you roll the dough, wrap it in plastic and refrigerate it for about 30 minutes. If you are making a two crust pie, wrap two balls separately. This facilitates ease of rolling. When you remove it from the refrigerator, let it sit for a few minutes to soften slightly.
  5. Roll the dough out on a very well-floured surface and use a well-floured rolling pin. I use either a Silpat or my Corian countertops, which I meticulously dry before rolling out the dough. I am also a fan of the French style rolling pin because I feel it gives me more control as I roll out my pie crust.
  6. If your crust breaks apart, rather than re-rolling it, patch it together. In my opinion, better an ugly pie than a tough one! You can always “fix” your ugliness by cutting decorations out of the remaining crust and putting it over the ugliest spots. I do it all the time.
  7. Don’t forget to cut slits in the top crust to allow steam to escape.
  8. Re-refrigerate your crust for about 30 min before baking.

Looking for an even more foolproof crust? Try Cook’s Illustrated’s crust that uses vodka for an even flakier pastry!

Ginger Maple Applesauce

Homemade ApplesauceYesterday was the perfect fall morning at the Olympia farmers’ market. There was a crisp chill in the air, which significantly reduced crowd size. Still, given the offerings available this time of year at the market, the chill was worth it. Along with a dizzying array of organic apples from Washington’s bumper apple crops, there were large ears of corn, juicy plums, chanterelles, squash, pole beans, red and white raspberries, concord grapes, and many others. One of my favorite types of produce from fall in Washington State is pluots. A cross between a plum and an apricot, the pluot is like a juicy, sweet plum. If you come across these tasty stone fruit, give them a try. I think you’ll love them.

As far as I am concerned, however, the star of the show for fall is apples. I love apple season with a passion approaching my love for writing. In fact, as soon as the days grow shorter and the leaves start to change color, I begin cooking with apples. The dogs love it. They gather at my feet as I peel and chop, accepting tiny slices of apple they chew with great gusto. (Tip – never give your pets apple seeds, which contain traces of cyanide.) At the market yesterday, the variety was amazing. Braeburn, Fuji, Jazz, Lady Alice, Gravenstein, Pink Lady, Rose, Honeycrisp…it’s an apple lovers paradise.

I enjoy baking apple pies, crisps, cakes, and turnovers. I also like making a simple applesauce, which I will be making today from the organic Honeycrisp, Pink Lady, and Jazz apples I bought yesterday.

When cooking with apples, I take a minimalist approach. I like to let the flavors of the fruit shine through. This doesn’t mean lots of sugar or heavy spices. Instead I use just enough to enhance the natural flavors of the apples instead of overpowering them.  Some of my favorite spices to use include fresh grated nutmeg, cinnamon, allspice, cloves, and fresh grated ginger. I also usually use just a touch of lemon zest and lemon juice to prevent the apples from turning brown and bring out the tart notes.

Another trick for baking with apples is using a few different varieties in one dish. For instance, in my pies I often mix Granny Smith and Pink Lady apples. In fact, Pink Lady apples are my favorite eating and baking apples, followed closely by Honeycrisp.

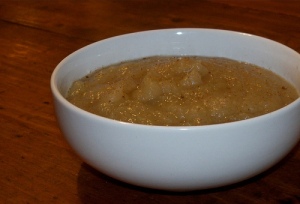
Today, I will be making a simple applesauce. Recipe below.

Ginger Maple Applesauce

  • 4 Pink Lady apples – Peeled, cored, and chopped
  • 4 Honeycrisp apples,  peeled, cored, and chopped
  • 4 Jazz apples, peeled, cored, and chopped
  • 1 cup water
  • 1/2 cup pure maple syrup
  • 2 T. fresh ginger root, grated
  1. Place apples and water in a large pot and simmer on the stove top, covered until apples begin to break down, about 15 to 20 minutes.
  2. Remove from heat and stir, mashing apples together.
  3. Stir in ginger root and maple syrup.
  4. If you prefer a smooth applesauce instead of a rustic one, cool and process in a food processor or food mill.

German Apple Pancake

pancakeI grew up with an apple tree in my backyard. That may explain, at least in part, why I get so excited this time of year when the farmer’s markets are filled with bins of bright, colorful apples in a dizzying array of varieties. I am drawn to the rosy orbs as a moth to a flame, and I frequently arrive home from my farmer’s market Saturday with bags of the beautiful fruit.

I love to cook with apples. So far, I’ve gotten no objections from my family. I love their firm feel in my hand as I peel them, and the tart scent that arises when I slice them. I love their crisp snap, and the scents of complimentary spices, reminding me of fall. Apple season is here, and dang it, I couldn’t be more excited!

When I cook with apples, my dogs line up in the kitchen to “help.” As I prepare my apples, I cut them tiny, crisp slices. I have an insanely crazy affection for the sound of my dogs chewing on crispy apples.

While many varieties exist, I have a few favorites for cooking. Usually, I mix up a few varieties in any recipes in order to obtain variations in texture and sweetness that adds a delicious complexity. Some of the varieties I particularly enjoy include:

  • Pink Lady
  • Honeycrisp
  • Lady Alice
  • Braeburn

Over the next several weeks, I’m guessing you will be seeing some apple recipes appearing in this blog. I hope you’ll indulge me and pardon my enthusiasm. I hope you’ll even venture out to a farmer’s market to take advantage of fall’s bounty and then try some of the recipes I offer. Today, I’m going to start with a favorite that I share with my kids when I get on one of my several weeks’ long “pancakes from around the world” kicks where every weekend I make pancakes ostensibly from another country.
&nbsp

German Apple Pancake
 
Ingredients

  • 4 eggs, beaten
  • 1/2 cup flour
  • 1/2 tsp. baking powder
  • 1 tbsp. white sugar
  • 1/4 tsp fresh grated nutmeg
  • Dash salt
  • 1 cup whole milk
  • 2 tsp. vanilla extract
  • 2 tbsp. melted unsalted butter
  • 3 tbsp. unsalted butter
  • 1/4 to 1/2 c. sugar
  • 1 large apple, sliced (I like honeycrisp for this, though any apple will do)

Method

  1. Preheat the oven to 425 degrees.
  2. In a blender or food processor, beat eggs.
  3. Add flour, baking powder, sugar, nutmeg, and salt and process to combine. Leave blender running.
  4. Combine wet ingredients (milk, vanilla, 2 tbsp. unsalted butter), and pour slowly into running blender or food processor until ingredients are well combined. Set aside.
  5. In a 12″ skillet you can put in the oven, heat 3 tbsp unsalted butter to bubbling.
  6. Sprinkle part of the sugar in the butter and arrange apple slices over the top. Sprinkle the remaining sugar on top of apple slices.
  7. Saute over medium high heat for a few moments, until apples begin to soften.
  8. Carefully pour the batter over the top of the apples and move the pan to the oven.
  9. Bake for 15 minutes at 425 degrees. Reduce heat to 375 and bake an additional ten minutes.
  10. Slice into wedges and serve, sprinkled with powdered sugar.

Chicken Pot Pie

chickenpieWhen I was a kid, I HATED chicken pot pie. My mom would buy the Swanson’s premade chicken pies and bake them. The mushy vegetables and cubes of super soft chicken weren’t appetizing to me. Worse, they contained what I considered to be the most awful vegetable on the face of the earth. Peas.

I hated peas with a vengeance as a kid. For a while, I tried hiding them in my napkin or throwing them on the floor. Sadly for me, my mother was just a little cleverer than that I gave her credit for being, so those avenues of pea disposal were lost to me. I can recall a few dinners sitting long after everyone else was done eating, staring down the slimy green objects I found so disgusting. Then I hit on the perfect solution. If I swallowed them whole with my milk, I didn’t have to taste them at all. Chicken pie, however, made this exercise more of a challenge, and I dreaded seeing those Swanson’s boxes on the counter.

In high school, a close family friend was also my home economics teacher. Etta Kirk taught a class called Meal Management, and we made all sorts of really great foods like cream pies and cinnamon rolls. We also made chicken pie, a lesson I knew was coming and dreaded with the same intensity I used to fear seeing a bag of frozen peas in the freezer. Still, Etta encouraged us to try everything we’d cooked in the class. The chicken pie didn’t suck, but it still wasn’t my favorite. I avoided it for years.

It wasn’t until about five years ago that I had a revelation. I was a grown up, and I could put whatever vegetables I wanted into my chicken pie, and there didn’t have to be a single pea in it. I set out on a mission to create a chicken pie that I would love.

Here’s the good news. If you love peas, you can add them into this recipe. You can change up the herbs and vegetables, and make a chicken pie that suits your palate if you just use the really simple techniques I outline below. The result will be a rustic, delicious, comforting chicken pie that is sure to become a family favorite. The best part? You don’t even need to know how to make pie crust. I’ve hit on a simple solution that has earned rave reviews. Instead of making pie crust, I purchase pre-made puff pastry sheets in the grocer’s freezer section, and top my pie with that.

Deep Dish Chicken Pie

Ingredients

  • 1/4 pound raw pancetta, diced (you can find pancetta in the deli section of the grocery store. You can also use bacon, which will impart much smokier flavor. I prefer pancetta.)
  • 2 tablespoons olive oil or butter
  • 1 pound chicken thighs, boned and quartered
  • Kosher salt and fresh cracked black pepper
  • 1 sweet onion, diced
  • 2 carrots, peeled and diced
  • 2 stalks celery, diced
  • 1/4 cup flour
  • 1 cup dry white wine
  • 3 cups chicken stock
  • 1/2 bag frozen pearl onions
  • 1/2 pound crimini mushrooms, quartered (mushroom haters – these are optional)
  • One sheet frozen puff pastry, thawed on the counter for 30 minutes, plus flour for rolling
  • 1 egg, beaten slightly
  • 3 tablespoons fresh or 2 tablespoons dried tarragon

Method

  1. Preheat the oven to 400 degrees.
  2. In a large saute pan, heat oil on medium high and cook pancetta. Remove pancetta from oil with a slotted spoon and set aside in a deep pan such as a deep dish pie dish or a 9 x 9 deep dish square pan.
  3. Season chicken with salt and pepper and cook in oil from pancetta in batches, allowing it to caramelize before turning it over. Do this by leaving chicken in contact with the pan for 3-4 minutes before flipping it. You do not need to cook chicken all the way through – just allow it to develop flavor by browning it on both sides. Do not overcrowd the pan. I typically perform this step in 2-3 batches. Remove chicken from pan and set aside with pancetta.
  4. Using the same pan and oil, add diced onions, carrots, and celery (mirepoix). Leave the vegetables in contact with the pan to allow flavor to develop before stirring, about 3 to four minutes. Stir and allow vegetables to soften. Reduce heat to medium.
  5. Add flour to the vegetables and oil, stirring constantly for two minutes.
  6. Add wine to pan, stirring constantly and scraping any browned bits from cooking off the bottom of the pan.
  7. Add chicken stock and allow to come to a simmer and thicken slightly, stirring constantly.
  8. Pour the mixture over chicken and pancetta in deep dish pan. Add mushrooms,  pearl onions and tarragon. Stir to combine.
  9. On a floured surface, slightly roll out your sheet of puff pastry so it is large enough to overlap the edges of your pan. Place on top of the deep dish and crimp the edges by pinching them between your fingers.
  10. Brush beaten eggs along the top of the crust in a light wash.
  11. Bake for 40 minutes, until crust is golden brown. Serve immediately.

Serve this with a nice dry white like a Chardonnay.

Some tips:

  • Prepare all of your proteins and vegetables before you start cooking, so that everything is set out and ready to go when it is time to cook. This is referred to as “mise en place,” which means everything in place. This is the best way to cook anything – with all of your ingredients pre chopped, pre-measured, and ready to go before you cook.
  • Mirepoix is a standard combination of diced carrots, celery and onions. Try to cut all of your vegetables to roughly the same size so they cook evenly. The standard measurements for mirepoix are two parts onion to one part carrot and one part celery. It serves as a flavor base for many dishes.
  • Develop flavor by leaving chicken and vegetables in contact with the pan so it starts to caramelize. Don’t skimp on this step, because it makes a huge flavor difference, adding layers of complexity to your cooking.
  • Don’t shorten your cooking time with the flour. When you add flour to oil or melted fat (even if there are vegetables in the oil), you are making a roux. A roux is a standard way of thickening
  • When you add the wine to the pan, make sure you scrape all of the browned bits off the bottom  to incorporate the flavor into the broth.
  • If you wish to add other vegetables (like peas), use fresh rather than frozen, and add them just before you put the crust on top and put the pie in the oven.
  • You can trade tarragon for thyme, which is also really good in this recipe. If you add thyme, a little garlic would be nice, as well. Add it in the last few moments of sauteeing your vegetables, right before you add the flour. Garlic doesn’t need to cook long. As soon as you can smell it, it’s good enough. If you cook it too long, it grows bitter. If you are using tarragon, don’t add garlic – because the garlic will overwhelm the delicate character of the tarragon.