Spicy Slow Cooker Pot Roast

PotRoastby Karen Frazier

I tend to cook fairly seasonally. In the spring, summer, and early fall, I go to the local farmers market to pick out beautiful locally grown fruits, vegetables, and herbs and then plan my meals based on whatever I bring home. In the late fall, winter, and early spring our local farmers market closes, and I am left with what I can find in grocery store’s organic section or, occasionally, what I can pick up at the year-round farmers market in Olympia.

Cooking in this way also follows my natural appetites. In the summer, my meals are lighter with fresher flavors and lots of greens. As summer fades, however, I tend to cook heartier foods with more warming, deeper flavors. I also cook lots of root vegetables, because that’s what is available.

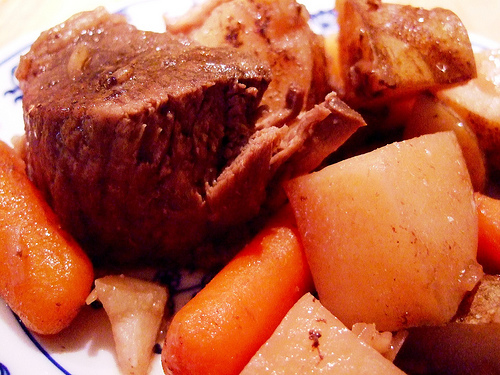
Pot roast is the quintessential fall/winter meal. It features an affordable and fatty cut of meat and flavorful root vegetables. Because the fatty cuts you use for pot roast perform best under low, slow, and moist cooking conditions, the slow cooker is the ideal vehicle for a tasty pot roast.

I’m a big fan of browning meat and vegetables before putting them in the slow cooker. This just adds an extra depth of flavor. However, if you don’t feel like doing any browning, then just toss everything in the slow cooker raw. It will still be pretty darn tasty.

Spicy Slow Cooker Pot Roast

  • 4 tablespoons fat, divided (I used rendered bacon grease for this one for a little bit of additional smoky flavor)
  • 1 organic onion, sliced
  • 4 organic garlic cloves, roughly chopped
  • 1 three to four pound grass fed chuck roast
  • Sea salt
  • Fresh cracked black pepper
  • 1/2 cup red wine (or beef stock)
  • 1/2 cup homemade beef bone broth
  • 1 teaspoon organic garlic powder
  • 1 teaspoon organic onion powder
  • 1 teaspoon organic ground mustard seed
  • 2 tablespoons freshly grated organic horseradish root (or more to taste), divided
  • 2 cups organic whole baby carrots
  • 2 bulbs organic celeriac, peeled and cut into cubes
  1. In a large saute pan, heat two tablespoons of the fat over medium-high heat. Add the onions and cook, stirring occasionally, until they begin to brown, seven to eight minutes.
  2. Add the garlic and cook, stirring constantly, until it is fragrant, about 30 seconds more.
  3. Put the onions and garlic in the slow cooker and return the sauté pan to the heat. Add the remaining two tablespoons of fat.
  4. Season the chuck roast liberally with salt and pepper. Put it in the hot fat and cook it, searing it on all sides, four to five minutes per side. Put the chuck roast in the slow cooker with the onions.
  5. Return the sauté pan to the heat. Add the wine and stir, scraping any browned bits off the bottom of the pan with the side of a spoon. Add the beef stock and whisk in the garlic powder, onion powder, ground mustard seed, and freshly grated horseradish. Simmer for about three minutes to allow the flavors to blend.
  6. Put the baby carrots and celeriac in the slow cooker with the roast and onions. Pour the wine mixture over the top.
  7. Cover the slow cooker and cook on low until the meat is tender, eight to ten hours on low or four to five hours on high.
  8. Grate in the remaining one tablespoon of horseradish root just before serving.
  9. Optional: If you wish to turn the sauce into gravy, then ladle out the liquid from the slow cooker. Put it in a saucepan and whisk in 1/4 cup of arrowroot powder mixed with 1/4 beef stock. This will add about 28 grams of carbs to the entire recipe, so if you are eating low-carb paleo, you may wish to skip this step. For low-carb paleo, simmer the liquid in a saucepan over medium-low heat until it reduces and thickens, about ten minutes.

photo credit: jypsygen via photopin cc

Advertisement

Mushroom Soup with Italian Sausage and Fennel

mushroom soupby Karen Frazier

Tendergrass farms makes a tasty grass-fed, sugar-free Italian sausage. I really like it, and so I enjoy using it in soups, spaghetti sauce (with zucchini spaghetti of course), and other recipes. In the fall when delicious mushrooms are so abundant, I especially enjoy mushroom dishes, which is why you’re seeing so many of them in my recipe feed lately.

This soup is delicious and hearty. It really hits the spot on a cold fall evening. I use my typical thickening method…pureeing the vegetables and adding them back into the broth, because it works so well.

Mushroom Soup with Italian Sausage and Fennel

  • 1 bulb organic garlic, the top sliced off
  • 2 tablespoons melted fat (lard, duck fat, etc.)
  • Sprinkling of sea salt
  • Sprinkling of organic chopped fresh rosemary
  • 1 package organic dried porcini mushrooms
  • 6 cups homemade beef or chicken bone broth
  • 3 tablespoons melted fat (I use duck fat)
  • 1 pound sugar-free, organic pastured pork Italian sausage, casings removed
  • 1 onion, sliced
  • 1 pound seasonal organic mushrooms (can be any variety), sliced
  • 1 bulb organic fennel, chopped
  • 1/4 cup dry sherry (or more broth)
  • 1 teaspoon organic dried thyme
  • 1/4 teaspoon red pepper flakes
  • 1 teaspoon sea salt (or to taste)
  • 1/2 teaspoon fresh cracked black pepper.
  • Two tablespoons chopped organic fennel fronds
  1. Preheat your oven to 350 degrees Fahrenheit. Place the cut garlic heads on a large piece of foil. Drizzle them with two tablespoons of the melted fat and sprinkle them with salt and rosemary. Wrap them in the foil. Roast the garlic in the preheated oven for about 90 minutes, until soft. Allow it to cool slightly, and then squeeze the cloves out of the papery skin and into a bowl. Set aside.
  2. In a large saucepan, heat the bone broth until it simmers. Remove the broth from the heat and add the dried porcini mushrooms. Cover and allow the mushrooms to soak until they are soft, about two hours.
  3. In a large dutch oven, heat three tablespoons of fat over medium-high heat until it shimmers. Add the Italian sausage and cook, breaking the sausage apart with a spoon, until it is browned, five to seven minutes. Remove the sausage from the fat with a slotted spoon and set aside on a platter.
  4. Add the onion to the fat in the pan and cook over medium heat, stirring occasionally, until it softens and begins to brown, five to seven minutes. Remove the onions from the fat with a slotted spoon and set it aside in the bowl of a food processor fitted with a metal chopping blade.
  5. If needed, add a little more fat to the pan. Over medium-high heat, cook the mushrooms in the fat, stirring occasionally, until they soften, seven to ten minutes. Remove the mushrooms from the fat with a slotted spoon. Put half of the mushrooms into the food processor with the onions and put the remaining half on the platter with the Italian sausage.
  6. Add the fennel to the remaining fat in the pan (or add a bit more if necessary). Cook over medium-high heat, stirring occasionally, until the fennel is soft, five to seven minutes.
  7. Add the red wine to the pot. Using the side of your spoon, scrape any browned bits from the bottom of the pan.
  8. Use a slotted spoon to remove the reconstituted porcini mushrooms from the stock and put them in the food processor with the other vegetables. Pour the stock into the cooking pot.
  9. Add the cooked sausage and mushrooms from the platter, thyme, red pepper flakes, salt, and pepper to the pot. Reduce the heat to medium-low and allow it to simmer.
  10. Meanwhile, add the roasted garlic to the food processor with the mushrooms and onions. Process until the vegetables form a smooth paste, 30 seconds to one minute.
  11. Stir the vegetables back into the pot of soup to thicken it.
  12. Cook, stirring occasionally, until the soup warms through, about five more minutes. Adjust seasoning as necessary.
  13. Serve garnished with fennel fronds.

For an easier to make but still paleo version, but with a slightly higher carb count (about 12 g per serving versus about 7 g per serving):

  • 1 package organic dried porcini mushrooms
  • 6 cups homemade beef or chicken bone broth
  • 3 tablespoons melted fat (I use duck fat)
  • 1 pound sugar-free, organic pastured pork Italian sausage, casings removed
  • 1 onion, sliced
  • 1 pound seasonal organic mushrooms (can be any variety), sliced
  • 1 bulb organic fennel, chopped
  • 4 cloves garlic, minced
  • 1/4 cup dry sherry (or more broth)
  • 1 teaspoon organic dried thyme
  • 1/4 teaspoon red pepper flakes
  • 1 teaspoon sea salt (or to taste)
  • 1/2 teaspoon fresh cracked black pepper.
  • 1/4 cup arrowroot powder
  • 1/4 cup water
  • Two tablespoons chopped organic fennel fronds
  1. Preheat your oven to 350 degrees Fahrenheit. Place the cut garlic heads on a large piece of foil. Drizzle them with two tablespoons of the melted fat and sprinkle them with salt and rosemary. Wrap them in the foil. Roast the garlic in the preheated oven for about 90 minutes, until soft. Allow it to cool slightly, and then squeeze the cloves out of the papery skin and into a bowl. Set aside.
  2. In a large saucepan, heat the bone broth until it simmers. Remove the broth from the heat and add the dried porcini mushrooms. Cover and allow the mushrooms to soak until they are soft, about two hours. Remove the mushrooms from the broth and chop them roughly. Return them to the broth.
  3. In a large dutch oven, heat three tablespoons of fat over medium-high heat until it shimmers. Add the Italian sausage and cook, breaking the sausage apart with a spoon, until it is browned, five to seven minutes. Remove the sausage from the fat with a slotted spoon and set aside on a platter.
  4. Add the onion to the fat in the pan and cook over medium heat, stirring occasionally, until it softens and begins to brown, five to seven minutes. Remove the onions from the fat with a slotted spoon and set it aside with the sausage.
  5. If needed, add a little more fat to the pan. Over medium-high heat, cook the mushrooms in the fat, stirring occasionally, until they soften and brown, seven to ten minutes. Remove the mushrooms from the fat with a slotted spoon. Set them aside with the sausage.
  6. Add the fennel to the remaining fat in the pan (or add a bit more if necessary). Cook over medium-high heat, stirring occasionally, until the fennel is soft, five to seven minutes. Add the garlic and cook, stirring constantly, until it is fragrant, about 30 seconds.
  7. Add the sherry to the pot. Using the side of your spoon, scrape any browned bits from the bottom of the pan.
  8. Pour the stock into the cooking pot. Add the cooked sausage, mushrooms, and onions back to the pot along with the thyme, red pepper flakes, salt, and pepper.
  9. Reduce the heat to medium-low and allow it to simmer.
  10. In a small bowl, whisk together the arrowroot powder and water. Pour them into the simmering pot, stirring constantly, until the soup thickens slightly.
  11. Adjust seasoning as necessary.
  12. Serve garnished with fennel fronds.

photo credit: RonjaNilsson via photopin cc

Slow Cooker Lamb Osso Buco

osso bucoby Karen Frazier

Several years ago, I came into possession of some cross-cut veal shanks, so I made Jim osso buco. He was immediately enamored, and it is one of his top requested meals. Of course, veal isn’t necessarily so easy to get where I live, but lamb is. Recently I picked up some pastured cross-cut lamb shanks, and I decided to adapt my osso buco recipe for the slow cooker, and for lamb. With an orange gremolata stirred in at the end, it’s really delicious.

Lamb Osso Buco

  • 4 pastured (grass fed) cross-cut lamb shanks
  • 1 onion, sliced
  • 2 large organic carrots, peeled and sliced
  • 4 cloves of garlic, sliced
  • 1 stalk of organic celery, sliced
  • 1 can (14 ounces) organic diced tomatoes, drained
  • Juice of 1/2 an orange
  • 3 sprigs of thyme
  • Sea salt and fresh cracked black pepper to taste
  • 1 bunch Italian parsley, washed, dried, and finely chopped
  • 3 cloves of garlic, finely chopped
  • Zest of one orange, finely grated
  1. In the crock of a slow cooker, combine lamb, onion, carrots, garlic, celery, tomatoes, orange juice, thyme, salt, and pepper. Cover and cook on low for 8 to 10 hours, or on high for 4 to 5 hours.
  2. After the osso buco is cooked, remove the lid and turn the slow cooker up to high. Allow to simmer, uncovered, for an additional 30 to 60 minutes to thicken the sauce.
  3. Meanwhile, combine the parsley, cloves, and orange zest with a pinch of sea salt. Stir into the osso buck just before serving.

photo credit: Micaiena via photopin cc

Slow Cooker Bone Broth

by Karen Frazierbroth

Anemia has been a big problem for me in the last five years or so. Not the mild anemia that makes me a little tired, but severe, often debilitating anemia that makes me exhausted to walk down the hall from my bedroom to my living room. In the past several weeks, however, I’ve added mineral rich, nourishing bone broth as a food I eat daily. It seems to be helping.

I have my bone broth in the morning just like someone else would have a cup of coffee. It’s rich in minerals and gelatin. It’s also really helped with how I feel. My energy is up. My digestion is working better. And my hair and nails from the gelatin – wow are they in good shape.

Many people are intimidated to make their own broth, but with a slow cooker, it’s really easy. I let mine simmer on the counter for 12 to 24 hours, extracting all of the good, rich mineral content from the bones. I use bones from organic, pastured animals, and I split them with a cleaver before sticking them in my slow cooker in order to make the mineral rich marrow more readily available to absorb into the broth as it simmers. I also add iron-rich parsley to bring even more iron to my healing brew.

My homemade broth serves as the base for or an ingredient in many of the foods I make. I use it to moisten stews, make gravies, create sauces, and make soup. Homemade broth adds delicious savoriness to your meals that is free of chemicals and artificial ingredients.

All About Bone Broth

So what goes into bone broth?

The bones: I use bones from pastured animals of all stripes. The bones can come from cooked foods (like a roasted  chicken carcass) or they can be raw. Sometimes I use chicken wings. I have beef marrow bones. I have beef knuckle bones. I save bones from whatever we eat. I have a baggie in the freezer full of bones. Whenever we have something with bones in it, I save the bones. I have a few ducks necks. I have some chicken feet, which add a wonderful gelatin to the broth. I have oxtails. While I get my pastured meat from local farmers and stores, I also order some of it from US Wellness Meats, which has high quality bones ready for your bone broth.

You can make your broth from a single source – like all beef or all chicken – or you can mix up bones from a variety of different animals. Just make sure you get some good cartilage bones in there like chicken feet, wings, or backs in order to up the gelatin content. Some people like to roast their bones ahead of time for additional flavor. This is especially true of beef bones, which get a delicious umami flavor when roasted.  Be sure to add some bones with some meat on them for even more flavor. When I use poultry wings, backs, or necks, I just toss them in meat and all. If you want to use the meat for something, rescue it from the bones after four or five hours of cooking and set it aside for use. Then, put the bones back in the stock to keep simmering.

The veggies: I’m a traditionalist in my veggie selections. I toss in an onion (usually cut into quarters or eights – you don’t have to peel it, and you can throw in the root ends), carrots, leeks if I’ve got them, and some celery. Occasionally I’ll throw in a few mushrooms, as well. If I’m feeling super fancy, I’ll add some organic dried shiitake mushrooms. I use all organic veggies, and I wash them thoroughly before putting them in the pot. You don’t need to cut them into tiny pieces. I just do a very rough chop (cutting carrots into three or four pieces each, same with celery). I always toss in a few celery leaves, as well.

One of the tricks I have for adding veggies to bone broth is this: I save my veggie trimmings from other cooking and freeze them in a large zipper bag. So I save onion peels, onion root ends, carrot root ends, celery tops, mushroom stems, etc. Then, I just dump them in my bone broth when I’m ready to make it.

The herbs and spices: You can use any herbs and spices you like in your broth. I prefer fresh herbs like rosemary, thyme, or sage. I just toss a few branches in there – I don’t bother to chop because they’ll be strained out later. I also add whole peppercorns, and a little bit of sea salt to the mix. I also add parsley for additional iron content. I usually add an entire bunch of organic parsley.

The liquid: I add just enough filtered water to cover the veggies/bones. I also add about a tablespoon of raw apple cider vinegar. This helps pull the minerals out of the bones. I actually let the water and vinegar soak with the bones for about an hour before I turn the slow cooker onto low.

Basic Bone Broth

  • Pastured organic bones and joints, a few containing meat
  • One or two organic onions, roughly chopped
  • Two organic carrots, roughly chopped
  • One organic celery rib, roughly chopped, with leaves
  • 1 sprig organic thyme
  • 1 sprig organic rosemary
  • 10 peppercorns
  • 1 bunch organic parsley
  • 1 to two tablespoons raw apple cider vinegar
  • Enough filtered water to cover the bones and vegetables
  1. Use a cleaver to split the bones open.
  2. Place all ingredients in the slow cooker. Add water just to cover the bones and vegetables.
  3. Cover the slow cooker and allow the stock to soak off heat for one hour.
  4. Turn on the slow cooker to low.
  5. Simmer on low for 12 to 24 hours. Poultry bones do better closer to 12 hours, beef bones 24.
  6. Strain the broth into a container, discarding any solids. Save the bones – you can reuse them until they go soft. Just freeze them in a zipper bag and pull them out the next time you make a broth.
  7. Chill the container, and then scrape any fat off the top before using the bone broth. The broth will turn to gelatin when chilled, which gives it wonderful body when you use it for soups and sauces.

This broth also is excellent in soups and stews – way better than anything commercially prepared. I always have a bunch frozen in individual containers in my freezer.
photo credit: paloetic via photopin cc

Wine and Horseradish Braised Short Ribs with Caramelized Onion Cauliflower Mash

short ribby Karen Frazier

Jim went to his cardiologist yesterday and got the go ahead for his primal diet. I was thrilled, because some doctors don’t like it that much. I’m glad to know my instincts were decent in this case. So tonight, I’m making use of my slow cooker and some grass fed, organic primal cut short ribs we picked up. I’m braising them in red wine and horseradish sauce, and turning the braising liquid into a gravy with which to top the cauliflower. I’m trying to give Jim non-primal flavors with a good health payoff.

There’s some controversy in the paleo world about red wine. Some people have it. Some don’t. If you know Jim and me, then you know we are wine enthusiasts. So I’m cooking with it tonight. It’s a sometimes thing instead of an every night indulgence now.

Jim has been so careful about following his diet that I wanted to make him something delicious, and I think this qualifies. Plus, I wanted to experiment with paleo gravy techniques.

Slow Cooker Wine and Horseradish Braised Short Ribs with Caramelized Onion Cauliflower Mash

For the short ribs:

  • 3 slices pastured sugar-free bacon (we get ours at US Wellness Meats), cut into pieces
  • 2 three-rib slabs of grass fed organic beef short ribs, cut into individual ribs
  • Sea salt and fresh cracked black pepper, to taste
  • 2 onions, sliced
  • 1 pound organic cremini mushrooms
  • 1 pound organic baby carrots or 4 large carrots, peeled and sliced
  • 2 sprigs organic fresh thyme
  • 2 sprigs organic fresh rosemary
  • 2 tablespoons organic prepared horseradish (or more to taste)
  • 2 cups dry red wine
  • 5 cloves garlic, finely minced or through a garlic press
  1. Season the ribs with sea salt and fresh cracked black pepper and place in the bottom of a slow cooker.
  2. Brown the bacon in a skillet over medium-high heat until the fat is rendered. Using a slotted spoon, put the bacon in the slow cooker. Set aside the bacon fat for the caramelized onions and cauliflower you’ll make later.
  3. Add the remaining ingredients to the slow cooker and stir. Cook, covered, on low for 8 to 10 hours or high for five hours.
  4. When the meat has cooked, remove it from the cooking liquid with tongs and set aside on a platter.
  5. Using a slotted spoon or skimmer, remove all of the vegetables from the cooking liquid and place them in a food processor. Remove the thyme and rosemary branches and throw them away.
  6. Leaving the top slot of the food processor open so steam can escape, puree the vegetables until smooth. Stir them back into the cooking liquid in the slow cooker until the liquid thickens.
  7. Return the meat to the cooking liquid and reduce heat to keep warm while you prepare the cauliflower.

For the cauliflower:

  • 2 tablespoons pastured bacon fat
  • 1 large onion, thinly sliced
  • 2 heads organic cauliflower, broken into small florets
  • 2 tablespoons of reserved bacon fat (or, if you’re not allergic to dairy like me, substitute pastured butter or another animal fat such as lard or duck fat)
  • Sea salt and fresh cracked black pepper, to taste
  1. In a large saute pan, heat the bacon fat over medium heat until it melts.
  2. Add the onions in a single layer in the pan. Reduce the heat to medium-low.
  3. Cook, stirring occasionally, until the onions are reduced and caramelized, about 45 minutes.
  4. In a large pot, cover the cauliflower with water. Cover the pot and set it on the stove to boil on high heat until the cauliflower is soft, 15 to 20 minutes.
  5. Drain the cauliflower well and allow it to sit in the colander for a few minutes to remove as much liquid as possible.
  6. Transfer the cauliflower and caramelized onions to the food processor. Add one to two tablespoons of butter, bacon fat, or some other fat. Process until smooth. Be sure to leave the top slot of the food processor open so the steam can escape.
  7. Season to taste with salt and pepper.

Now, serve the meat and gravy over the mashed cauliflower. Delicious, I promise!

A bit about my food processor warning. When I was a little kid, my mom was pureeing hot lentil soup in the food processor. It went boom and wound up all over the kitchen ceiling. My mom was lucky she didn’t get burned by the scalding hot soup.

When blending hot foods in a blender or food processor, steam build up can cause hot liquid and food to force its way out of the top of the processor. It can blow the lid clean off a blender. The best way to protect yourself is to open the chute at the top of the blender or food processor as you blend. Then, fold a towel several times and place it on top of the blender or processor. Place your hand on top of the towel to hold the lid in place. The towel will protect your hand. Finally, don’t stick your face right over the top of the open chute, just in case. Open the lid cautiously after blending hot  foods.

So – when I mentioned I was making mashed cauliflower on Facebook, I got some negative feedback about it. Apparently it’s a love it or hate it kind of food. I like it. With this, the caramelized onions really do mellow the flavor, and the bacon fat (if you use it) adds a lovely smokiness. Still – if you just can’t see yourself eating mashed cauliflower, consider another mashed paleo-friendly food such as celeriac or sweet potatoes.

photo credit: thebittenword.com via photopin cc

Potato Soup with Italian Sausage, White Beans, and Kale

soupThis hearty soup makes a delicious meal. When I first made it, I had fresh garlic scapes available, which was really tasty. Unfortunately, garlic scapes are only available about one month out of the year, so I’ve adapted the recipe for use with any garlic. If at all possible, use fresh, in-season garlic that hasn’t yet been cured. I have also made the recipe gluten-free by using masa harina (corn flour used to make corn tortillas). I find masa harina has a very clean flavor that is similar to wheat flour. Some other gluten-free flours add off flavors to soups and stews, but the masa harina does not. You can substitute any other gluten-free flour if you wish, or add all-purpose flour if you don’t have any problems with gluten. To make the soup dairy-free, as well, use your favorite non-dairy milk in place of the heavy cream and either use clarified butter or a clean-tasting oil that works well at high-temperatures, such as grape seed oil.

Potato Soup with Italian Sausage, White Beans, and Kale

  • 1/4 cup butter
  • 2 pounds bulk sweet Italian sausage
  • 1 onion, finely chopped
  • 2 carrots, peeled and finely chopped
  • 1 bunch kale, stemmed and cut into bite sized pieces
  • 5 cloves garlic, through a press
  • 1/4 cup masa harina (or all-purpose flour for non-gluten-free)
  • 5 cups chicken stock
  • 1/4 teaspoon crushed red pepper flakes
  • 2 teaspoons onion powder
  • 1 teaspoon garlic powder
  • 1 (14 ounce) can white beans, drained
  • 2 large potatoes, peeled and diced
  • 1/2 cup heavy cream
  • Sea salt and fresh cracked black pepper, to taste
  1. In a large pot, heat butter on medium-high until it bubbles. Add the sausage and cook, crumbling as you cook, until it browns. Remove the cooked sausage from the pot with a slotted spoon and set it aside on a platter.
  2. Add the onion and carrots to the fat that remains in the pan. Cook, stirring occasionally, until the vegetables begin to brown, about six minutes.
  3. Add the kale and cook, stirring frequently, until it softens, about three more minutes.
  4. Add the garlic and cook, stirring constantly, until it is fragrant, about 30 seconds.
  5. Add the masa harina and cook, stirring constantly, for two minutes.
  6. Add the chicken stock. Use the side of the spoon to scrape any browned bits from the bottom of the pot as you add the stock.
  7. Add the red pepper blames, onion powder, garlic powder, beans, and potatoes. Return the sausage to the soup, adding the juices that have collected on the platter, as well.
  8. Bring the pot to a simmer and reduce heat to medium-low. Simmer the soup until the potatoes soften, about 10 minutes.
  9. Stir in the cream. Season to taste with salt and pepper.

Shrimp Tequila Chowder

shrimp tequila chowderI reverse engineered this from Azteca Restaurants Shrimp Diablo Chowder. I think it’s pretty close, and very delicious!

Shrimp Tequila Chowder

  • 1 lb shrimp, peeled, deveined, tails removed, and cut into fourths
  • 1/2 cup tequila, divided
  • Juice of 2 limes
  • 3 cloves garlic, put through a garlic press
  • 3 tablespoons oil or butter
  • One onion, diced
  • 1 jalapeno, seeded and minced
  • 1 carrot, peeled and diced
  • 3 tablespoons flour (use sweet rice flour for gluten-free)
  • 4 cups gluten-free chicken stock
  • 1 can Rotelle (tomatoes and peppers)
  • 1 can crisp summer corn, drained
  • 1 lb red potatoes, cubed
  • 2 cups heavy cream
  • 1/4 teaspoon chipoltle
  • 1/2 teaspoon dried cumin
  • 3 tablespoons corn starch, dissolved into 3 tablespoons chicken stock
  • Salt and fresh cracked pepper to taste
  1. Combine 1/4 cup tequila, lime juice, and garlic in a small bowl. Toss with shrimp and set aside.
  2. Heat oil or butter in a soup pot.
  3. Add onions, jalapeno, and carrots. Saute until carrots are soft, about 5 minutes.
  4. Add flour and stir until raw flour flavor is gone – about four minutes.
  5. Stir in remaining 1/4 cup tequila, scraping up any bits on bottom of pan.
  6. Add chicken stock, Rotelle, corn, potatoes, cream, cumin, and chipoltle.
  7. Bring to a simmer and cook until potatoes are tender.
  8. Stir in corn starch slurry.
  9. Remove shrimp from marinade and stir into soup.
  10. Taste for seasoning and add salt, pepper, and additional chipoltle to taste.

Here’s the chowder with a paleo makeover (although tequila is not technically paleo). If you’re watching carbs, this version has about 12 grams of carbs per serving (it serves 8). Leave out the celeriac and it has about 10 grams of carbs per serving.

  • 1 lb shrimp, peeled, deveined, tails removed, and cut into fourths
  • 1/2 cup tequila, divided
  • Juice of 2 limes
  • 3 cloves garlic, put through a garlic press
  • 3 tablespoons fat (I use duck fat)
  • 1 pound grass fed chorizo (I use bison chorizo from US Wellness Meats)
  • One onion, diced
  • 1 jalapeno, seeded and minced
  • 1 carrot, peeled and diced
  • 4 cups homemade chicken bone broth
  • 1 can organic, sugar-free tomatoes and peppers (or organic canned crushed tomatoes plus 1 small can organic diced jalapeños)
  • 1 lb celeriac, peeled and cubed
  • 1/4 teaspoon chipoltle
  • 1/2 teaspoon dried cumin
  • 1/4 cup arrowroot powder, dissolved into 1/4 cup water
  • Salt and fresh cracked pepper to taste
  1. Combine 1/4 cup tequila, lime juice, and garlic in a small bowl. Toss with shrimp and set aside.
  2. Heat fat in a soup pot.
  3. Add chorizo and cook until it is browned. Remove it from the fat with a slotted spoon and set it aside on a platter.
  4. Cook the onions, jalapeno, and carrots in the fat that remains in the pan. Saute until carrots are soft, about 5 minutes.
  5. Stir in the remaining 1/4 cup tequila, scraping up any bits on bottom of pan.
  6. Add chicken broth, tomatoes and peppers, celeriac, cumin, and chipoltle.
  7. Bring to a simmer and cook until celeriac is tender.
  8. Stir in the arrowroot slurry.
  9. Remove shrimp from marinade and stir into soup. Return the chorizo to the pot.
  10. Taste for seasoning and add salt, pepper, and additional chipoltle to taste.

Clam Chowder

chowderI love  making soups because it’s just so darn difficult to go wrong, and with a simple base, you can change the ingredients around and have something completely different. Soup is also inexpensive, satisfying, and you can make large batches to freeze for use on days when you don’t have time to cook. Soups are also a great way to sneak veggies to picky eaters, and you can make them light or heavy.

Right now, I’ve got a big pot of clam chowder simmering on my stove. Chowders are incredibly easy to make, and to adapt for personal taste. For instance, if you don’t like clams you could turn it into a shrimp, lobster, shellfish, or even corn chowder. With a clean and neutral flavor base, you can also change up the herbs and seasonings you use. Tonight’s chowder has a non-traditional mirepoix. Instead of using carrots, celery, and onions for it, I used carrots, onions, and fennel – which is a terrific replacement for celery. It has a licorice like flavor that I really love.

My clam chowder is pretty easy.

  1. I start with several slices of pepper bacon – and saute it in my soup pot until it is crispy.
  2. Next, I add chopped onion, fennel, and carrots, and saute them until they are soft.
  3. I turn my bacon and veggies into a roux, adding about 1/4 cup of flour (or sweet rice flour for gluten-free) for every 3 cups of stock I will add. I let the raw flour flavor cook off, stirring, for about two minutes.
  4. Then, I add gluten-free chicken stock. As I add the stock, I scrape my pan with my spoon to get all of the flavor that is sitting in the bottom in the form of browning on the pan.
  5. As the broth thickens and starts to simmer, I add cubed red potatoes (skin on) and give it a good stir.
  6. I add a little fresh cracked pepper and some thyme.
  7. I let the broth simmer until the potatoes are soft – about 10-15 minutes depending on the size.
  8. I add clams – either canned or fresh and stir them until they are cooked through – about five minutes for raw, or just a minute or two for cooked clams.
  9. I taste and add seasoning (salt, additional pepper if needed).
  10. I swirl in a little bit of cream (eliminate for dairy-free).

That’s it. Ten easy steps. You can change up veggies and herbs to your preference. You can add more vegetables for a chunky chowder, or less for a thinner one.

Coq au Vin

coqJim and I were working side-by-side in the kitchen last night. Actually, since I was in the midst of the world’s worst hot flash, he was cooking and I was instructing. Jim isn’t much of a cook – something he’ll freely admit. He can follow instructions pretty precisely and do okay. He’s awesome on the grill. He sometimes comes across something he decides is a “magic ingredient” and begins adding it to absolutely everything he cooks (such as the great Emeril Lagasse Kicked Up Gahlic Salad Dressing explosion of 2002 where he combined the salad dressing and green beans, wrapping it in a tortilla because, hey – it’s a burrito). But really what Jim does is heat stuff up so that it is warm enough to ward off bacteria and food-borne illness. This is how many people cook – with the goal of getting the food cooked, rather than making it flavorful.

On the other hand, building flavor is pretty easy if you know a few cooking techniques. If you can get food to the proper temperature in order to serve it, if you can combine ingredients in a recipe to make a dish, then you can begin to build flavors in your food. Best of all, it won’t take that much longer than just following the recipe ingredient by ingredient and your food will improve by leaps and bounds.

One of the best ways to build flavor is via the Maillard reaction. I know – it sounds all fancy, but it’s really pretty simple. When meat browns, it happens due to the Maillard reaction. When bread browns, same thing. Essentially, what you need to know about the Maillard reaction is this: it adds flavor to food. At its most basic, the Maillard reaction occurs when heat is added to foods containing amino acids and carbohydrates. In food terms, it adds tremendous savoriness meats and other foods.

For example, how do you like your steak? I am a medium rare gal, myself, but I know some people who like their steak super rare in the middle. Yet these same people wouldn’t consider eating a cut of meat that is entirely uncooked. When you are served a rare steak in a restaurant, it arrives crisp and brown on the outside, but when you cut into it, it is nearly raw. And most of the flavor on that steak comes from the brown part on the outside (as well as seasonings), which has browned due to the Maillard reaction.

To promote the Maillard reaction in your cooking:

  • Don’t crowd the pan. That inhibits the reaction and instead causes steaming. I work in batches.
  • Leave whatever you are cooking in contact with the heat without moving it for several minutes until it browns. Do this with vegetables, mushrooms, onions, meats. This allows for tremendous flavor development.
  • If you are thickening with flour, add it to the heated fat in the pan and then let it cook for a few minutes to develop flavor.
  • When you add liquids to a pain that you’ve browned meat and/or vegetables in to make a sauce, don’t waste the flavor that is stuck to the pan. Use the side of a wooden spoon to scrape the browned bits off the bottom of the pan.

Let’s look at the application of the Maillard Reaction in a recipe for coq au vin.

Coq au Vin

  • 6 thick slices bacon, chopped
  • One chicken, cut into pieces, skin left on
  • Salt and black pepper to taste
  • 1 lb button mushrooms, quartered
  • 1-1/2 cup pearl onions (fresh or frozen)
  • One onion, diced
  • One carrot, peeled and diced
  • One celery stalk, peeled and diced
  • 4 cloves garlic, sliced
  • 6 tbsp flour (or sweet rice flour for gluten-free)
  • Two cups dry red wine
  • Two cups gluten-free chicken stock
  • 2 Tbsp thyme
  1. Preheat oven to 350 degrees.
  2. In a large, oven proof pot such as a dutch oven, cook bacon over medium high heat until crisp. Remove bacon from fat with a slotted spoon and set aside.
  3. Season chicken pieces with salt and pepper. Working in batches, cook the chicken pieces in the bacon fat until skin is browned on both sides.
  4. Remove chicken from pan and set aside. Add the mushrooms to the oil in the pan. Allow them to stay in contact with the pan for about four minutes to brown before stirring them. Continue to stir and cook for a few more minutes. Remove from oil with a slotted spoon and set aside.
  5. Add pearl onions to the pan, allowing them to stay in contact with the pan and brown for a few minutes before stirring. Once cooked, remove them from the pan and set aside.
  6. Add mirepoix to pan (diced onions, carrots, celery). Cook in the oil without stirring until they are browned. Once browned, stir and cook until tender.
  7. Add garlic and continue to cook, stirring until garlic releases its scent – about 30 seconds.
  8. Sprinkle the flour over the vegetables and stir to cook flour about four minutes.
  9. Pour wine into pan, scraping the bottom of the pan and stirring as you do. Cook for a few minutes to remove alcohol flavors.
  10. Add chicken stock and thyme. Stir to combine.
  11. Return chicken, mushrooms, pearl onions, and bacon to the pan, making sure you add any juices that have accumulated, as well. Stir to combine and bring to a simmer.
  12. Cover pan and place in preheated oven. Cook 60 minutes, until chicken is tender. Serve with egg noodles or rice if you prefer gluten-free.

Chicken Soup with Homemade Noodles – Love in a Bowl

chickensoupFor me, cooking for my family and friends is about more than just the Zen I achieve in the kitchen. It’s also about putting love on a plate. Food that is made with love has a certain extra something that you don’t get when you open a can or microwave a meal. I spend time considering ingredients, deciding how to build flavors, and planning which foods will complement one another on a plate. I try to create foods that the people I am cooking for will love. I put my heart and soul into my food, and hopefully it comes across in the way I intended it – as a plate or bowl full of pure love.

Today, I made a simple dish, but for me it is the epitome of love in a bowl: chicken soup. This simple meal can be tremendously satisfying when you take the time to develop flavors. Making it even more satisfying, I made some basic egg noodle dough and rough cut noodles that floated in the soup. As sometimes happens, fate stepped in and I had a bunch of ingredients in my refrigerator that lent itself well to chicken soup – and that I needed to get rid of. The result was delicious, and the thickly cut egg noodles made it hearty and satisfying, as well.

Homemade Egg Noodles

  • 1-1/2 cup of flour
  • 1/2 tsp salt
  • 2 large eggs
  1. Sift the flour and salt into a bowl. Make a well in the center of the flour, and crack the eggs into it.
  2. I mix the noodles with my (very clean) hands, gradually incorporating the flour into the eggs until I have a rough dough.
  3. Turn the dough out onto a floured surface and knead it until it is smooth and elastic, about 5 minutes.
  4. Allow the dough to sit for 10 minutes to relax the glutens.
  5. If using a pasta roller, roll to desired width and roughly cut into egg noodles.
  6. If using a rolling pin, roll the dough to desired thickness and cut into strips.
  7. Set aside for a few hours to dry slightly.

Chicken Soup with Egg Noodles

  • 1 pound boneless, skinless chicken – I prefer thighs for flavor and texture
  • Salt and fresh cracked black pepper to taste
  • Lite (in color – not calories) olive oil
  • 1 carrot, peeled and diced
  • 1 stalk celery, diced
  • 1 onion, diced
  • 1 bulb fennel, diced
  • 5 cloves of garlic, minced
  • Chicken stock
  • 1/2 lb crimini mushrooms, chopped
  • Thyme
  • Juice of one or two lemons
  • Salt and black pepper to taste
  1. Cut chicken into bite sized chunks. Season with salt and pepper.
  2. Heat a few swirls of lite olive oil in a large pot over medium high heat until it shimmers.
  3. Working in batches, cook chicken in the pot. Don’t overcrowd the pan. Allow the chicken full contact with the pot bottom until  it starts to brown. As the meat browns, it caramelizes the sugars in the protein, known as the Maillard reaction. Once the meat has caramelized on one side, turn it over to allow it to continue to cook through. Your chicken will not react with caramelization if the pan is too crowded, so work in two or three batches.
  4. Remove the cooked chicken from the pot with a slotted spoon and set it aside on a plate.
  5. Add the carrots, celery, onion, and fennel to remaining oil in the pot, distributing evenly across the bottom. Allow vegetables to stay in contact with the pot without stirring until it begins to brown (but not burn), about 4-5 minutes. This allows the flavors to caramelize and will add richness to your soup.
  6. Stir in garlic, cooking just until the garlic is fragrant. If you cook it for more than about 30 seconds, the garlic can burn and become bitter.
  7. Add chicken stock to fill pot about half way, scraping the bottom of the pan as you do to lift all of the flavors that have caramelized there.
  8. Add mushrooms, lemon juice and a few teaspoons of thyme.
  9. Return chicken to the pan, pouring any juices that have collected on the plate into the soup, as well.
  10. Bring soup to a boil, and add the noodles.
  11. Return to a boil and cook until noodles are el dente – about 6 to 7 minutes.
  12. Taste and season as needed with salt and pepper.

That’s the chicken soup I made today, but mine is never the same twice. I just used what I had available in my refrigerator. The good thing about chicken soup is that you can change it to suit your own tastes. Change the thyme for rosemary. Add different seasonal vegetables like zucchini or green beans. Add rice instead of egg noodles. Once you can make a basic chicken soup, the possibilities are endless to make your own love in a bowl.