Mushroom Soup with Italian Sausage and Fennel

mushroom soupby Karen Frazier

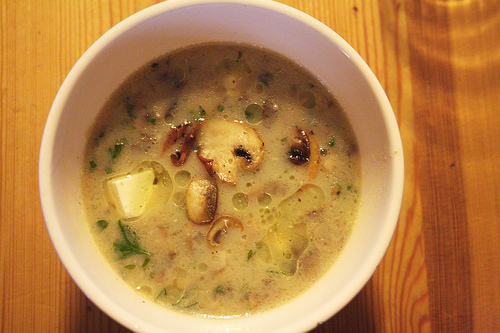
Tendergrass farms makes a tasty grass-fed, sugar-free Italian sausage. I really like it, and so I enjoy using it in soups, spaghetti sauce (with zucchini spaghetti of course), and other recipes. In the fall when delicious mushrooms are so abundant, I especially enjoy mushroom dishes, which is why you’re seeing so many of them in my recipe feed lately.

This soup is delicious and hearty. It really hits the spot on a cold fall evening. I use my typical thickening method…pureeing the vegetables and adding them back into the broth, because it works so well.

Mushroom Soup with Italian Sausage and Fennel

  • 1 bulb organic garlic, the top sliced off
  • 2 tablespoons melted fat (lard, duck fat, etc.)
  • Sprinkling of sea salt
  • Sprinkling of organic chopped fresh rosemary
  • 1 package organic dried porcini mushrooms
  • 6 cups homemade beef or chicken bone broth
  • 3 tablespoons melted fat (I use duck fat)
  • 1 pound sugar-free, organic pastured pork Italian sausage, casings removed
  • 1 onion, sliced
  • 1 pound seasonal organic mushrooms (can be any variety), sliced
  • 1 bulb organic fennel, chopped
  • 1/4 cup dry sherry (or more broth)
  • 1 teaspoon organic dried thyme
  • 1/4 teaspoon red pepper flakes
  • 1 teaspoon sea salt (or to taste)
  • 1/2 teaspoon fresh cracked black pepper.
  • Two tablespoons chopped organic fennel fronds
  1. Preheat your oven to 350 degrees Fahrenheit. Place the cut garlic heads on a large piece of foil. Drizzle them with two tablespoons of the melted fat and sprinkle them with salt and rosemary. Wrap them in the foil. Roast the garlic in the preheated oven for about 90 minutes, until soft. Allow it to cool slightly, and then squeeze the cloves out of the papery skin and into a bowl. Set aside.
  2. In a large saucepan, heat the bone broth until it simmers. Remove the broth from the heat and add the dried porcini mushrooms. Cover and allow the mushrooms to soak until they are soft, about two hours.
  3. In a large dutch oven, heat three tablespoons of fat over medium-high heat until it shimmers. Add the Italian sausage and cook, breaking the sausage apart with a spoon, until it is browned, five to seven minutes. Remove the sausage from the fat with a slotted spoon and set aside on a platter.
  4. Add the onion to the fat in the pan and cook over medium heat, stirring occasionally, until it softens and begins to brown, five to seven minutes. Remove the onions from the fat with a slotted spoon and set it aside in the bowl of a food processor fitted with a metal chopping blade.
  5. If needed, add a little more fat to the pan. Over medium-high heat, cook the mushrooms in the fat, stirring occasionally, until they soften, seven to ten minutes. Remove the mushrooms from the fat with a slotted spoon. Put half of the mushrooms into the food processor with the onions and put the remaining half on the platter with the Italian sausage.
  6. Add the fennel to the remaining fat in the pan (or add a bit more if necessary). Cook over medium-high heat, stirring occasionally, until the fennel is soft, five to seven minutes.
  7. Add the red wine to the pot. Using the side of your spoon, scrape any browned bits from the bottom of the pan.
  8. Use a slotted spoon to remove the reconstituted porcini mushrooms from the stock and put them in the food processor with the other vegetables. Pour the stock into the cooking pot.
  9. Add the cooked sausage and mushrooms from the platter, thyme, red pepper flakes, salt, and pepper to the pot. Reduce the heat to medium-low and allow it to simmer.
  10. Meanwhile, add the roasted garlic to the food processor with the mushrooms and onions. Process until the vegetables form a smooth paste, 30 seconds to one minute.
  11. Stir the vegetables back into the pot of soup to thicken it.
  12. Cook, stirring occasionally, until the soup warms through, about five more minutes. Adjust seasoning as necessary.
  13. Serve garnished with fennel fronds.

For an easier to make but still paleo version, but with a slightly higher carb count (about 12 g per serving versus about 7 g per serving):

  • 1 package organic dried porcini mushrooms
  • 6 cups homemade beef or chicken bone broth
  • 3 tablespoons melted fat (I use duck fat)
  • 1 pound sugar-free, organic pastured pork Italian sausage, casings removed
  • 1 onion, sliced
  • 1 pound seasonal organic mushrooms (can be any variety), sliced
  • 1 bulb organic fennel, chopped
  • 4 cloves garlic, minced
  • 1/4 cup dry sherry (or more broth)
  • 1 teaspoon organic dried thyme
  • 1/4 teaspoon red pepper flakes
  • 1 teaspoon sea salt (or to taste)
  • 1/2 teaspoon fresh cracked black pepper.
  • 1/4 cup arrowroot powder
  • 1/4 cup water
  • Two tablespoons chopped organic fennel fronds
  1. Preheat your oven to 350 degrees Fahrenheit. Place the cut garlic heads on a large piece of foil. Drizzle them with two tablespoons of the melted fat and sprinkle them with salt and rosemary. Wrap them in the foil. Roast the garlic in the preheated oven for about 90 minutes, until soft. Allow it to cool slightly, and then squeeze the cloves out of the papery skin and into a bowl. Set aside.
  2. In a large saucepan, heat the bone broth until it simmers. Remove the broth from the heat and add the dried porcini mushrooms. Cover and allow the mushrooms to soak until they are soft, about two hours. Remove the mushrooms from the broth and chop them roughly. Return them to the broth.
  3. In a large dutch oven, heat three tablespoons of fat over medium-high heat until it shimmers. Add the Italian sausage and cook, breaking the sausage apart with a spoon, until it is browned, five to seven minutes. Remove the sausage from the fat with a slotted spoon and set aside on a platter.
  4. Add the onion to the fat in the pan and cook over medium heat, stirring occasionally, until it softens and begins to brown, five to seven minutes. Remove the onions from the fat with a slotted spoon and set it aside with the sausage.
  5. If needed, add a little more fat to the pan. Over medium-high heat, cook the mushrooms in the fat, stirring occasionally, until they soften and brown, seven to ten minutes. Remove the mushrooms from the fat with a slotted spoon. Set them aside with the sausage.
  6. Add the fennel to the remaining fat in the pan (or add a bit more if necessary). Cook over medium-high heat, stirring occasionally, until the fennel is soft, five to seven minutes. Add the garlic and cook, stirring constantly, until it is fragrant, about 30 seconds.
  7. Add the sherry to the pot. Using the side of your spoon, scrape any browned bits from the bottom of the pan.
  8. Pour the stock into the cooking pot. Add the cooked sausage, mushrooms, and onions back to the pot along with the thyme, red pepper flakes, salt, and pepper.
  9. Reduce the heat to medium-low and allow it to simmer.
  10. In a small bowl, whisk together the arrowroot powder and water. Pour them into the simmering pot, stirring constantly, until the soup thickens slightly.
  11. Adjust seasoning as necessary.
  12. Serve garnished with fennel fronds.

photo credit: RonjaNilsson via photopin cc

Advertisement

Pork and Spinach Meatballs with Mushroom and Caramelized Onion Gravy

meatballsby Karen Frazier

Recently, I bought some lovely ground pastured pork from a local farmer and knew I wanted to make something tasty with it. Okay – true – I always want to make something tasty. As always, I turned to my slow cooker.

You may notice I’ve been posting a lot of slow cooker recipes lately. Here’s why. When you cook real food – that is, food that doesn’t come in packages, jars, and cans – it can be pretty time and labor intensive. Of course, the results are totally worth it, and I love to cook. But I’m cooking three real food meals every day – and I get tired of cleaning up the kitchen. Not the cooking – just the cleaning. Plus, Jim and I are often on different schedules, so we need to eat at different times.

The slow cooker takes care of both of these problems. First, my slow cooker is 7 quarts, so I can make a lot of food in it. Therefore, I typically double any recipe I post here. It simmers all day long, and I’ve got meals for two nights, plus leftovers for the freezer. (Bonus: The house smells great!) My freezer is packed with yummy slow cooker food that I can take out and heat up for any meal. That means that I not only get two dinners out of one day of cooking, but I also have additional breakfasts and lunches on demand. It gives Jim the opportunity to grab a healthy meal for lunches at work, too, instead of having to turn to something like a fast food meal.

The other reason I’ve been using the slow cooker so much is scheduling. When Jim and I are on our wildly divergent schedules, we can each eat a hot meals straight from the slow cooker when time permits. Slow cookers make it easy for busy families to grab a quick meal when they have the time.

So, that’s why I love my slow cooker and use it so much. Oh – and one other reason, as well. The slow cooker is a closed system that cooks on low heat all day. This tenderizes meats and allows flavors to meld beautifully, so the meals are hearty and delicious. What could be better?

For the caramelized onions in this recipe, I make a huge batch in the slow cooker. You can also make a batch by cooking thinly sliced onions on the stovetop on low heat in a sauté pan with a few tablespoons of fat and a pinch of salt for about 45 minutes, stirring occasionally.

Pork and Spinach Meatballs with Mushroom and Caramelized Onion Gravy

  • 2 tablespoons duck fat (or your fat of choice)
  • 2 onions, finely chopped, divided
  • 6 garlic cloves, minced, divided
  • 1 pound pastured ground pork
  • 1 teaspoon mustard powder, divided
  • 3 cups organic spinach, finely chopped
  • 1 pound organic mushrooms, divided
  • 1 organic carrot, grated
  • 1/2 teaspoon dried thyme
  • 1 teaspoon sea salt
  • 1/2 teaspoon fresh cracked black pepper
  • Pinch red pepper flakes
  • 3 carrots, peeled and chopped
  • 1 cup homemade beef or chicken stock
  • 1 sprig of fresh rosemary
  • 1/2 cup caramelized onions (about one onion)
  1. In a large saute pan, heat the duck fat over medium-high heat until it shimmers. Add one of the onions and cook, stirring occasionally, until they are soft, about five minutes.
  2. Add the two cloves of the garlic and cook, stirring constantly, until it is fragrant, about 30 seconds more. Remove the onions from the heat and allow to cool completely.
  3. In a large bowl, combine the cooked onions and garlic, pork, 1/2 teaspoon of the mustard powder, spinach, 8 ounces of the mushrooms (finely chopped), the grated carrot, the dried thyme, the sea salt, the pepper, and the red pepper flakes. Using your hands, mix well to combine.
  4. Roll the mixture into meatballs that are slightly smaller than a golf ball. Put the meatballs in the bottom of the slow cooker.
  5. Add the remaining onion (chopped), the remaining garlic (minced), the chopped carrots, the remaining 8 ounces of mushrooms (sliced), the stock, the rosemary sprig, and some salt and pepper to taste.
  6. Cover and cook on low for six hours.
  7. Before serving, remove the lid of the slow cooker and allow it to simmer for about 30 minutes uncovered. Using a slotted spoon, remove the meatballs from the slow cooker and set them aside on a platter, tented with foil. Remove the rosemary sprig and discard it. Using the same spoon, remove the solids (the carrots, mushrooms, and onions) from the broth in the slow cooker. Put them in a food processor or blender with the caramelized onions and the remaining half teaspoon of dried mustard and process until they form a smooth puree. (Remember to protect your hand with a folded towel and to allow steam to escape through the open top chute of the processor).
  8. Pour the mixture from the food processor back into the slow cooker, using a rubber scraper to make sure you get it all. Whisk the mixture to combine the broth in the slow cooker with the pureed vegetables.
  9. Return the meatballs to the slow cooker and stir to mix them with the gravy.
  10. Serve on pureed celeriac or cauliflower.

photo credit: gavinr via photopin cc

Paleo Bacon-Wrapped Meatloaf with Spicy Ketchup

meatloafby Karen Frazier

So here’s my problem with meatloaf without a panade (a mixture of breadcrumbs and milk). It tends to be heavy. It doesn’t get that loafy texture one associates with meatloaf. Naturally, I’ve been tinkering. It’s easy to make a meatloaf dairy and gluten-free – you just make breadcrumbs from GF bread and soak them in non-dairy milk. When you no longer consume grains, however, obtaining that texture gets harder.

I’ve seen different solutions to this in paleo and low-carb recipes over the years – things like crushed pork rinds (I hate those things) and chopped nuts. I think the pork rinds add an unpleasant porky flavor, but if you like them that might work out. As for the chopped nuts, they make the loaf even heavier.

As I was sitting and pondering the problem, I knew I needed some type of vegetable that would add a lighter texture, not a heavier one to replace the breadcrumbs. Then it hit me. Mushrooms. I put about 8 ounces in the food processor and chopped them up into a very fine texture (almost like breadcrumbs). Then, because I’m always trying to hide veggies from Jim, I decided I’d toss some carrots, sweet red bell pepper, and zucchini in there, too. I put them all in the food processor with several cloves of garlic and chopped them extremely finely. Then, I mixed it in with the meat, spices, and onion. The texture was actually pretty darn good.

In the past, my meatloaf has contained three different types of meat – 2 parts ground beef (15 percent fat), 1 part ground pork, and 1 part ground veal. This version is made from all ground beef, although you can adapt it to any meat mixture you wish. Leaving the fat content of the meat a bit higher makes the meatloaf moister.

Finally, I made a facsimile of ketchup. Then, I made it spicy. It was pretty good, and the texture of the meatloaf avoided that heaviness that comes from a loaf without breadcrumbs. I’m thrilled I was able to translate my non-paleo meatloaf into this tasty paleo version. The kids, on the other hand, are going to be super bummed.

Paleo Bacon Wrapped Meatloaf

  • 2 tablespoons fat (I use duck fat, because yum. You can also use lard, tallow, or grass-fed butter)
  • 1 onion, chopped
  • 8 ounces mushrooms, stems removed
  • 2 carrots, roughly chopped
  • 1 red bell pepper, seeded and roughly chopped
  • 1 small zucchini, roughly chopped
  • 5 garlic cloves
  • 2 pounds grass-fed ground beef (15 percent fat or higher)
  • 2 eggs, beaten
  • 1 tablespoon grated horseradish
  • 1 tablespoon Dijon mustard
  • 1 tablespoon onion powder
  • 1 tablespoon garlic powder
  • 1 teaspoon dried thyme
  • 2 tablespoons coconut aminos
  • 1-1/2 teaspoons sea salt
  • 1/2 teaspoon fresh cracked black pepper
  • 8 ounces thin sliced bacon
  1. Preheat the oven to 350 degrees Fahrenheit. Line a baking sheet with foil.
  2. In a large saute pan, heat the fat until it melts. Add the onions and cook until they are soft, about five minutes. Allow to cool before proceeding.
  3. In the bowl of a food processor fitted with a metal chopping blade, process the mushrooms, carrots, bell peppers, zucchini, and garlic until finely chopped. You may need to do this in batches to get the right size chop.
  4. In a large bowl, combine the ground beef, onions, chopped vegetables from the food processor, eggs, horseradish, mustard, onion powder, garlic powder, thyme, coconut aminos, salt, and pepper. Using your hands, mix until all the ingredients are well incorporated.
  5. Turn the mixture out onto the prepared baking sheet, patting it into a free-form loaf.
  6. Cover the entire loaf with slices of bacon.
  7. Bake in the preheated oven for 60 to 75 minutes, until a thermometer reads 165 degrees. Allow the meatloaf to rest for 30 minutes before slicing it.

Spicy Ketchup

  • 1 garlic clove
  • 9 ounces organic tomato paste
  • 1 (15 ounce) can organic chopped tomatoes, drained
  • 1/4 cup raw apple cider vinegar (or lemon juice if you don’t do vinegar)
  • Juice of one orange
  • 2 tablespoons raw honey (substitute a packet of stevia if you’re looking for low-carb)
  • 1/2 teaspoon allspice
  • 1 teaspoon onion powder
  • 1/4 teaspoon smoked paprika
  • 1 teaspoon onion powder
  • 1/4 teaspoon cayenne
  • 1/2 teaspoon sea salt
  • 1/2 teaspoon fresh cracked black pepper
  1. Combine all ingredients in a food processor and process until smooth.
  2. Scrape the ketchup into a small saucepan. Simmer on low heat, stirring occasionally, for 30 minutes. If it gets to thick, add more apple cider vinegar to thin it out a bit.

The ketchup will keep for two weeks in a tightly sealed container in the refrigerator, and will fulfill all your ketchup needs. It’s not just for meatloaf.

photo credit: su-lin via photopin cc

Slow Cooker Lamb Osso Buco

osso bucoby Karen Frazier

Several years ago, I came into possession of some cross-cut veal shanks, so I made Jim osso buco. He was immediately enamored, and it is one of his top requested meals. Of course, veal isn’t necessarily so easy to get where I live, but lamb is. Recently I picked up some pastured cross-cut lamb shanks, and I decided to adapt my osso buco recipe for the slow cooker, and for lamb. With an orange gremolata stirred in at the end, it’s really delicious.

Lamb Osso Buco

  • 4 pastured (grass fed) cross-cut lamb shanks
  • 1 onion, sliced
  • 2 large organic carrots, peeled and sliced
  • 4 cloves of garlic, sliced
  • 1 stalk of organic celery, sliced
  • 1 can (14 ounces) organic diced tomatoes, drained
  • Juice of 1/2 an orange
  • 3 sprigs of thyme
  • Sea salt and fresh cracked black pepper to taste
  • 1 bunch Italian parsley, washed, dried, and finely chopped
  • 3 cloves of garlic, finely chopped
  • Zest of one orange, finely grated
  1. In the crock of a slow cooker, combine lamb, onion, carrots, garlic, celery, tomatoes, orange juice, thyme, salt, and pepper. Cover and cook on low for 8 to 10 hours, or on high for 4 to 5 hours.
  2. After the osso buco is cooked, remove the lid and turn the slow cooker up to high. Allow to simmer, uncovered, for an additional 30 to 60 minutes to thicken the sauce.
  3. Meanwhile, combine the parsley, cloves, and orange zest with a pinch of sea salt. Stir into the osso buck just before serving.

photo credit: Micaiena via photopin cc

Caramelized Onions – In the Slow Cooker

caramelized onionsby Karen Frazier

Caramelized onions add a sweet umami flavor to any dish. Just a few of these delicious onions make the dishes to which you add them display deeper complexity and richness. Plus, they are just plain delicious, and they’re a great way to add flavor to ancestral recipes.

I use them to top burger patties and steaks. I puree them with faux mashed potatoes made from cauliflower or celeriac. I stir them into soups and stews. I puree them with other cooked veggies and stir them back into braising liquid to make a flavorful thick sauce or gravy. I fold them into omelets, cook them with chicken, mix them with pureed avocado for a creamy dip, and find dozens of other delicious uses for them.

So it stands to reason with that, with so many uses for caramelized onions, it makes cooking easier if I make them in bulk and freeze them. When I make a single serving of caramelized onions on the stovetop, it takes about 45 minutes, which isn’t realistic for busy weeknights. However, if I make them in bulk in the slow cooker and freeze them, they are really easy to incorporate in all kinds of delicious dishes.

Slow Cooker Caramelized Onions

  • 5 to 7 large yellow onions, peeled and thinly sliced (or however many fit in your slow cooker)
  • 3 tablespoons melted duck fat, lard, or your preferred fat
  • 1/2 teaspoon dried thyme
  • 1 teaspoon sea salt (or to taste)
  • 1/2 teaspoon fresh cracked black pepper
  1. Toss all ingredients together in a slow cooker to coat the onions.
  2. Cover the slow cooker and turn it on to low. Cook for about nine to ten hours, stirring occasionally, until the onions are soft and golden brown. Remove the lid and continue cooking the onions on low, stirring occasionally, for an additional one to two hours to allow excess liquid to evaporate.
  3. These will keep in the freezer for up to six months.

A note about the onions: The Environmental Working Group lists onions as one of its Clean 15, items that test only negligible amounts of pesticide residue. If I pick up onions at the farmers market, I buy them organic. Otherwise, I typically by conventionally grown onions at the grocery store.

One of my favorite cooking publications, Cooks Illustrated, recommends Spanish onions as the perfect caramelizing onion. I agree – if you can find them, try these. Otherwise, yellow onions are perfect. Sweet onions will make a very sweet caramelized onion, which may be a bit too much sweetness for some people. I prefer my caramelized onions on the more savory side with just a hint of sweetness, which is why I tend to use yellow onions or Spanish onions.

My favorite onions are cipollini, so I was excited to give those a try to caramelize. To my surprise they were almost aggressively savory – so just a few onions went a very long way.

photo credit: I Believe I Can Fry via photopin cc

Slow Cooker Bone Broth

by Karen Frazierbroth

Anemia has been a big problem for me in the last five years or so. Not the mild anemia that makes me a little tired, but severe, often debilitating anemia that makes me exhausted to walk down the hall from my bedroom to my living room. In the past several weeks, however, I’ve added mineral rich, nourishing bone broth as a food I eat daily. It seems to be helping.

I have my bone broth in the morning just like someone else would have a cup of coffee. It’s rich in minerals and gelatin. It’s also really helped with how I feel. My energy is up. My digestion is working better. And my hair and nails from the gelatin – wow are they in good shape.

Many people are intimidated to make their own broth, but with a slow cooker, it’s really easy. I let mine simmer on the counter for 12 to 24 hours, extracting all of the good, rich mineral content from the bones. I use bones from organic, pastured animals, and I split them with a cleaver before sticking them in my slow cooker in order to make the mineral rich marrow more readily available to absorb into the broth as it simmers. I also add iron-rich parsley to bring even more iron to my healing brew.

My homemade broth serves as the base for or an ingredient in many of the foods I make. I use it to moisten stews, make gravies, create sauces, and make soup. Homemade broth adds delicious savoriness to your meals that is free of chemicals and artificial ingredients.

All About Bone Broth

So what goes into bone broth?

The bones: I use bones from pastured animals of all stripes. The bones can come from cooked foods (like a roasted  chicken carcass) or they can be raw. Sometimes I use chicken wings. I have beef marrow bones. I have beef knuckle bones. I save bones from whatever we eat. I have a baggie in the freezer full of bones. Whenever we have something with bones in it, I save the bones. I have a few ducks necks. I have some chicken feet, which add a wonderful gelatin to the broth. I have oxtails. While I get my pastured meat from local farmers and stores, I also order some of it from US Wellness Meats, which has high quality bones ready for your bone broth.

You can make your broth from a single source – like all beef or all chicken – or you can mix up bones from a variety of different animals. Just make sure you get some good cartilage bones in there like chicken feet, wings, or backs in order to up the gelatin content. Some people like to roast their bones ahead of time for additional flavor. This is especially true of beef bones, which get a delicious umami flavor when roasted.  Be sure to add some bones with some meat on them for even more flavor. When I use poultry wings, backs, or necks, I just toss them in meat and all. If you want to use the meat for something, rescue it from the bones after four or five hours of cooking and set it aside for use. Then, put the bones back in the stock to keep simmering.

The veggies: I’m a traditionalist in my veggie selections. I toss in an onion (usually cut into quarters or eights – you don’t have to peel it, and you can throw in the root ends), carrots, leeks if I’ve got them, and some celery. Occasionally I’ll throw in a few mushrooms, as well. If I’m feeling super fancy, I’ll add some organic dried shiitake mushrooms. I use all organic veggies, and I wash them thoroughly before putting them in the pot. You don’t need to cut them into tiny pieces. I just do a very rough chop (cutting carrots into three or four pieces each, same with celery). I always toss in a few celery leaves, as well.

One of the tricks I have for adding veggies to bone broth is this: I save my veggie trimmings from other cooking and freeze them in a large zipper bag. So I save onion peels, onion root ends, carrot root ends, celery tops, mushroom stems, etc. Then, I just dump them in my bone broth when I’m ready to make it.

The herbs and spices: You can use any herbs and spices you like in your broth. I prefer fresh herbs like rosemary, thyme, or sage. I just toss a few branches in there – I don’t bother to chop because they’ll be strained out later. I also add whole peppercorns, and a little bit of sea salt to the mix. I also add parsley for additional iron content. I usually add an entire bunch of organic parsley.

The liquid: I add just enough filtered water to cover the veggies/bones. I also add about a tablespoon of raw apple cider vinegar. This helps pull the minerals out of the bones. I actually let the water and vinegar soak with the bones for about an hour before I turn the slow cooker onto low.

Basic Bone Broth

  • Pastured organic bones and joints, a few containing meat
  • One or two organic onions, roughly chopped
  • Two organic carrots, roughly chopped
  • One organic celery rib, roughly chopped, with leaves
  • 1 sprig organic thyme
  • 1 sprig organic rosemary
  • 10 peppercorns
  • 1 bunch organic parsley
  • 1 to two tablespoons raw apple cider vinegar
  • Enough filtered water to cover the bones and vegetables
  1. Use a cleaver to split the bones open.
  2. Place all ingredients in the slow cooker. Add water just to cover the bones and vegetables.
  3. Cover the slow cooker and allow the stock to soak off heat for one hour.
  4. Turn on the slow cooker to low.
  5. Simmer on low for 12 to 24 hours. Poultry bones do better closer to 12 hours, beef bones 24.
  6. Strain the broth into a container, discarding any solids. Save the bones – you can reuse them until they go soft. Just freeze them in a zipper bag and pull them out the next time you make a broth.
  7. Chill the container, and then scrape any fat off the top before using the bone broth. The broth will turn to gelatin when chilled, which gives it wonderful body when you use it for soups and sauces.

This broth also is excellent in soups and stews – way better than anything commercially prepared. I always have a bunch frozen in individual containers in my freezer.
photo credit: paloetic via photopin cc

Wine and Horseradish Braised Short Ribs with Caramelized Onion Cauliflower Mash

short ribby Karen Frazier

Jim went to his cardiologist yesterday and got the go ahead for his primal diet. I was thrilled, because some doctors don’t like it that much. I’m glad to know my instincts were decent in this case. So tonight, I’m making use of my slow cooker and some grass fed, organic primal cut short ribs we picked up. I’m braising them in red wine and horseradish sauce, and turning the braising liquid into a gravy with which to top the cauliflower. I’m trying to give Jim non-primal flavors with a good health payoff.

There’s some controversy in the paleo world about red wine. Some people have it. Some don’t. If you know Jim and me, then you know we are wine enthusiasts. So I’m cooking with it tonight. It’s a sometimes thing instead of an every night indulgence now.

Jim has been so careful about following his diet that I wanted to make him something delicious, and I think this qualifies. Plus, I wanted to experiment with paleo gravy techniques.

Slow Cooker Wine and Horseradish Braised Short Ribs with Caramelized Onion Cauliflower Mash

For the short ribs:

  • 3 slices pastured sugar-free bacon (we get ours at US Wellness Meats), cut into pieces
  • 2 three-rib slabs of grass fed organic beef short ribs, cut into individual ribs
  • Sea salt and fresh cracked black pepper, to taste
  • 2 onions, sliced
  • 1 pound organic cremini mushrooms
  • 1 pound organic baby carrots or 4 large carrots, peeled and sliced
  • 2 sprigs organic fresh thyme
  • 2 sprigs organic fresh rosemary
  • 2 tablespoons organic prepared horseradish (or more to taste)
  • 2 cups dry red wine
  • 5 cloves garlic, finely minced or through a garlic press
  1. Season the ribs with sea salt and fresh cracked black pepper and place in the bottom of a slow cooker.
  2. Brown the bacon in a skillet over medium-high heat until the fat is rendered. Using a slotted spoon, put the bacon in the slow cooker. Set aside the bacon fat for the caramelized onions and cauliflower you’ll make later.
  3. Add the remaining ingredients to the slow cooker and stir. Cook, covered, on low for 8 to 10 hours or high for five hours.
  4. When the meat has cooked, remove it from the cooking liquid with tongs and set aside on a platter.
  5. Using a slotted spoon or skimmer, remove all of the vegetables from the cooking liquid and place them in a food processor. Remove the thyme and rosemary branches and throw them away.
  6. Leaving the top slot of the food processor open so steam can escape, puree the vegetables until smooth. Stir them back into the cooking liquid in the slow cooker until the liquid thickens.
  7. Return the meat to the cooking liquid and reduce heat to keep warm while you prepare the cauliflower.

For the cauliflower:

  • 2 tablespoons pastured bacon fat
  • 1 large onion, thinly sliced
  • 2 heads organic cauliflower, broken into small florets
  • 2 tablespoons of reserved bacon fat (or, if you’re not allergic to dairy like me, substitute pastured butter or another animal fat such as lard or duck fat)
  • Sea salt and fresh cracked black pepper, to taste
  1. In a large saute pan, heat the bacon fat over medium heat until it melts.
  2. Add the onions in a single layer in the pan. Reduce the heat to medium-low.
  3. Cook, stirring occasionally, until the onions are reduced and caramelized, about 45 minutes.
  4. In a large pot, cover the cauliflower with water. Cover the pot and set it on the stove to boil on high heat until the cauliflower is soft, 15 to 20 minutes.
  5. Drain the cauliflower well and allow it to sit in the colander for a few minutes to remove as much liquid as possible.
  6. Transfer the cauliflower and caramelized onions to the food processor. Add one to two tablespoons of butter, bacon fat, or some other fat. Process until smooth. Be sure to leave the top slot of the food processor open so the steam can escape.
  7. Season to taste with salt and pepper.

Now, serve the meat and gravy over the mashed cauliflower. Delicious, I promise!

A bit about my food processor warning. When I was a little kid, my mom was pureeing hot lentil soup in the food processor. It went boom and wound up all over the kitchen ceiling. My mom was lucky she didn’t get burned by the scalding hot soup.

When blending hot foods in a blender or food processor, steam build up can cause hot liquid and food to force its way out of the top of the processor. It can blow the lid clean off a blender. The best way to protect yourself is to open the chute at the top of the blender or food processor as you blend. Then, fold a towel several times and place it on top of the blender or processor. Place your hand on top of the towel to hold the lid in place. The towel will protect your hand. Finally, don’t stick your face right over the top of the open chute, just in case. Open the lid cautiously after blending hot  foods.

So – when I mentioned I was making mashed cauliflower on Facebook, I got some negative feedback about it. Apparently it’s a love it or hate it kind of food. I like it. With this, the caramelized onions really do mellow the flavor, and the bacon fat (if you use it) adds a lovely smokiness. Still – if you just can’t see yourself eating mashed cauliflower, consider another mashed paleo-friendly food such as celeriac or sweet potatoes.

photo credit: thebittenword.com via photopin cc

Rosemary and Chive Roasted Sweet Potatoes

sweet potatoesby Karen Frazier

For years, I thought I hated sweet potatoes. Of course, my only experience with them was the syrupy sweet candied Thanksgiving type, dripping in sugar, sweetness, and sometimes even marshmallows. Frequently, the sweet potatoes that wound up on the Thanksgiving dinner tables I frequented even came from a can. Blech.

As a result, I avoided them like the plague.

Then, a few years ago, I decided to try them again. I purchased fresh organic sweet potatoes at the local farmers market and decided to roast them. I was trepidatious, but I was ready to give them the old college try. They were delicious! I made them a few times for the family, and then promptly forgot about them.

Last night we had guests over for dinner. Jim and I eat very differently these days, usually consuming veggies and protein with a little fruit tossed in here and there, but with guests coming, I decided I wanted to add a starch so my guests didn’t leave feeling hungry and dissatisfied.

We mostly eschew starches around here, saving them as an occasional treat instead of standard fare. As a result, I no longer cook white potatoes, rice, quinoa, or any other grains that I would traditionally offer as a side dish. I toyed for a moment with offering our guests mashed cauliflower, but in the end, while I love that stuff, I couldn’t do that to my guests. They might find it weird.

Then I remembered sweet potatoes. While a bit starchy, sweet potatoes have a lot of fiber and nutrition in them, including vitamins A and C. Likewise, unlike white potatoes, sweet potatoes don’t contain saponins, which are anti-nutrients that may disrupt cell membranes in the body. Plus, they’re pretty darn tasty.

So, I roasted some organic sweet potatoes, cooked a lovely rib roast, sautéed some chanterelles, and made a nice salad. Dinner was delicious, and I especially enjoyed the sweet potatoes. Here’s the recipe.

Rosemary and Chive Roasted Sweet Potatoes

  • 2 sweet potatoes, cut into 3/4-inch dice (skin still on)
  • 2 sprigs of fresh rosemary, stems removed and chopped
  • 3 tablespoons chopped fresh chives
  • 3 cloves of garlic, finely minced
  • 2 tablespoons duck fat, melted (or grass-fed butter or any other fat you choose to use)
  • Sea salt and fresh cracked black pepper to taste
  1. Preheat your oven to 425 degrees Fahrenheit.
  2. In a medium-sized bowl, toss the sweet potatoes, rosemary, chives, garlic, duck fat, salt, and pepper until the potatoes are well-coated.
  3. Put the potatoes in a pan, forming a single layer along the bottom. I use a 9×13″ casserole dish.
  4. Roast the potatoes for about 25 to 30 minutes. Stir the potatoes and turn them over. Continue roasting until the potatoes are browned, about 25 to 30 minutes more.

photo credit: SaucyGlo via photopin cc

Country Style Spare Ribs with Apples, Cabbage, and Fennel

porkby Karen Frazier

Things are about to take a turn here at Recipes for My Kids. As you may have already noted, I often include gluten-free and dairy-free recipes because I have celiac disease and a casein allergy. While the kids were still at home, I went ahead and prepared their favorites that contained dairy and gluten anyway. The result was that I cross-contaminated myself frequently, and often wound up feeling very ill.

Now Tanner is off to college, and Kevin is only here one or two weekends per month. When Tanner left about a month ago for college, I realized it was the perfect time to turn my kitchen into a gluten-free, dairy-free mecca. I meticulously cleaned the entire kitchen, removing all traces of gluten or dairy that had accumulated in drawers and cupboards over the years. I purchased new gluten-free cookware and utensils. I designated a small counter and a single cupboard the spot for preparation of gluten-containing foods like sandwiches or toasts, and implemented very specific cleaning protocols so if someone made a gluten-containing food, it didn’t cross over into my pristine area. Even the freezer has a designated gluten area (the bottom shelf), and the kids have a refrigerator up in their room if they want to store some gluten-containing food when they are home.

As a result, I started feeling better than I had in years. With even the tiniest traces of gluten and dairy cross-contamination removed from my home, the years of symptoms I’d experienced such as exhaustion and digestive discomfort went away. Clearly I was on the right track.

With dairy and gluten grains off the table, my ultimate plan was to move in the direction of an ancestral style diet that didn’t contain any grains, processed foods, industrial seed oils, chemicals, processed sugar, or processed salt. My plan was to move into a more ancestral way of eating gradually. Then, about a week after Tanner left for school, Jim had a heart attack. I decided at that moment it was time to truly revamp his diet and mine in order to protect his heart health in the future.

Today, just four weeks later, my kitchen is a very different place. I cook every meal from scratch – all aspects of it – and I make it without grains, processed foods, or industrial seed oils. Jim has already lost 15 pounds in about two weeks, and his health is the best I have seen it in quite some time. We’re lucky because his heart attack was very mild. It served as a wake-up call to both of us.

Because I’m cooking so much, I’ve come up with a few strategies to give myself a break so I’m not in the kitchen constantly. For example, I typically make enough in each meal so that we get two dinners out of it, as well as something for the freezer. That way, on nights I don’t feel like cooking, I’ve got food in the freezer that can easily be thawed and reheated.

I’m also using my slow cooker. A lot. When it’s not in use cooking meals, I’ve got it simmering with a bone broth or stock to use in recipes. To make the stocks, I use bones and trimmings from meat, carrots, onions, celery, garlic, and herbs. I simmer it for 12 to 24 hours depending on the type of bones and freeze it so I have it on hand whenever I want to make a quick soup.

So – this is a very long way of saying this. You’ll notice things changing here on the blog. All recipes from this point forward (unless I’m getting in the way back machine and pulling out a favorite recipe from the past) are both gluten-free and dairy-free. More likely than not, they’ll also be grain-free and contain lots of healthy plant foods and pastured ingredients. Some may call it paleo. Some may call it primal. But I just call it delicious. So here’s the first paleo recipe. Enjoy!

Country Style Spare Ribs with Apples, Cabbage, and Fennel

  • 2 sweet tart organic apples (such as honey crisp), peeled, cored, and sliced
  • 1 organic fennel bulb, thinly sliced
  • 1 red onion, thinly sliced
  • 3 cloves garlic, minced
  • 1/4 cup raw apple cider vinegar
  • 1/4 cup chicken stock
  • 1/2 teaspoon cinnamon
  • 1 sprig thyme
  • Dash cayenne
  • 2 pounds pastured country style pork spare ribs
  • Sea salt and fresh cracked black pepper to taste
  • 1 small green organic cabbage, cut into small pieces
  1. In a large slow cooker, combine the apples, fennel, onion, garlic, apple cider vinegar, chicken stock, cinnamon, thyme, and cayenne. Stir to combine.
  2. Season the pork with sea salt and fresh cracked black pepper. Add to the slow cooker and stir to combine with the vegetables and apples.
  3. Cover and cook on low for 8 to ten hours, or on high for five hours.
  4. An hour before serving, stir in the cabbage. Cover and continue to cook on low for an additional hour.